Thursday, February 17, 2011

Shooting veneers...

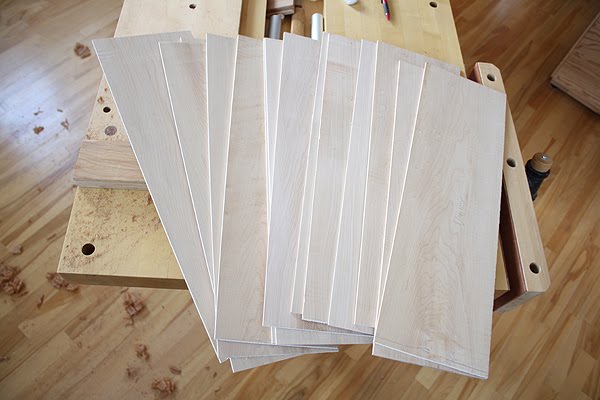
I left off with a good selection of soft maple veneer slices. These veneers are narrow or a little over half the width necessary for the cabinet panels. I need to double them up to create the wider sheets necessary for the cabinets. One long edge of each of the slices needs to be jointed as it will mate with another corresponding narrow slice of maple. I carefully select and match the slices to form pairs; these pairs are somewhat similar in grain and graphics to present a cohesive expanse of veneer. The technique I use to create a perfectly matching edge which can be used to join the two halves is to fold the veneers over and joint them simultaneously. This techniques serves to create a matching joint regardless if the edge is perpendicular to the face, although it is. It is a time proven technique, I didn't invent it, just glad someone thought of successfully doing it this way! The shooting process is quite straightforward. Clamp the two veneers together at one end and hold the other end, or clamp both ends, your choice. I use a wood handplane with a square body, this works well along the surface of my bench.

I have to say this part of the cabinet construction is very enjoyable. Creating all the bits and pieces I will need to assemble the cabinets ensures that the components are uniform and correctly matched in grain and graphics. Word of advice, be very generous with markings when building multiples. All the components I an creating will be used in one or the other cabinet and matched accordingly. Also, the orientation of the grain of each of the veneers sheets is important. Grain orientation should be in the same direction for certain reasons, the main reason is that the grain direction affects any handplaning and scraping operations. The chatoyance of the woods is also dependant on how the grain is oriented and having two reversing slices of veneer together can create a strange effect in the right light. Next I will begin to assemble these veneer slices to form the wider sheets of maple veneer.

Resawn veneers...

I left off with rough cut planks. These particular soft maple planks are thicker than I need; this allows me to resaw a couple of sheets of veneer from each of the planks. I typically slice a veneer sheet from one side and then slice another veneer sheet from the opposite side. I do this to equalize the contact the newly cut plank has with the surrounding air to avoid any warping, twists, cupping or bowing of the resulting, narrower board. The planks I am working with are on average seven inches wide so this does not present too much of a load on my bandsaw and it is easy to track the planks straight and true through the wide blade.

The thickness of each board after resawing the veneers sheets is still thicker than I ultimately need for the cabinets, this will be to allow for handplaning and any irregularities in the resulting boards. I need quite a few of these maple veneer sheets as they will be doubled up for each of the panels in the two cabinets. In this case eight panels, therefore sixteen sheets of soft maple veneer are necessary. There are a few extra sheets I have also sawn just in case. The resawing went well, with each of the sheets a little over 1/8 inch in thickness. One side of each sheet of veneer has been dressed on the jointer prior to resawing so I will only need to smooth the other face of each of the veneer sheets. It is a great feeling to be able to draw so much more wood from single planks of wood instead of planing away to reduce the thickness. Some of the veneer sheets in the photo above.

Wednesday, February 16, 2011

The beginning...

The creation of these two cabinets begins with rough planks of wood which I have been acclimatizing in my studio for many months. While the exterior sides and door fronts are of ambrosia maple, the majority of the cabinet, the top, bottom and interior are of soft maple. I begin with rough planks of soft maple which have been cross-cut into manageable pieces, somewhat longer than the longest dimension I will be needing. The soft maple I have is fairly thick so I can remove a layer or two of veneer from the majority of the planks. This has another benefit in that the grain or graphics of the soft maple are similar throughout the cabinet since the veneers originate from the same boards which are reserved for the top and bottom of the cabinet.

In the photo there are a total of ten soft maple boards, eight of which will be used for tops and bottoms and the other two boards strictly used to slice veneers from. After having worked with wood for many years, I am still both amazed and excited to see the process of turning rough wood into fine, polished boards for furniture. Slicing veneers can sometimes be challenging particularly if the widths of veneer are wide. This taxes the bandsaw I use and in some of these cases it is at the limit of what it can cut. I need to slow the speed at which I feed boards through the blade considerably to compensate for these wide boards. Another benefit of utilizing veneers in the creation of furniture is that valuable wood is saved as a few slices of veneer can be sawn from a single board.

Tuesday, February 15, 2011

Cabinet design...

I was given the opportunity to design and build a pair of cabinets recently. The design of the individual cabinets is very similar and this process exercises my skills at producing more than one piece of studio furniture at a time. The cabinets are destined for different locations and will be slightly different in the outside graphics of the side panels and doors. The other elements of each cabinet are fairly similar in many respects. The dimensions of each of the cabinets is both based on my earlier work and the size of the woods I have available for the components of each cabinet. I have not decide on the interior layout yet, although I have something in mind.

The availability of the woods to be able to create these cabinets is an important consideration for me since it can be somewhat of a limiting factor in the dimensions of the cabinet. In this case the limiting factor is the side panel width and the door widths. The side panels will be veneered inside and out since I plan to use highly figured ambrosia maple on the outside and lighter soft maple on the insides of these panels. Likewise for the doors of the cabinets. I like to have a seamless expanse of wood on both the outside of the side panels and the door fronts therefore the width of ambrosia maple I have limits these widths, although I do have fairly wide ambrosia maple planks on hand.

The drawing illustrates the basic design of the cabinet with overall dimensions specified. The depth of the cabinet is another consideration in the design. I need to have a minimum depth to introduce stability into the cabinet design, in this case I have decided on a 12 inch depth for the cabinet itself. The cabinet stand will be slightly deeper but not noticeably.... this to provide a smooth transition from the upper cabinet down to the cabinet stand.

Saturday, February 12, 2011

Mixed media sculptures (2)...

The second in this series of sculptures depicts an oriental styled shrine. I decided to continue using curved wood elements and stone with this piece. The top and bottom wood elements are fairly symmetric and I added small, narrow lengths of blackwood to the bottom of the sculpture for stability. The stone is surrounded with vertical ebony pieces creating the structure around the stone. This particular sculpture began as a small sketch and some wood pieces I had on hand in my studio. The conceptual drawing of this sculpture was a little difficult to envision in three dimensions since I was not sure if the scale of the curved elements would be overwhelming to the central stone element. I think I got it right though, the curved elements depict the roof and base of the shrine while accentuating the central stone and ebony section.

I deliberated over striking the correct balance of colour in this sculpture. I feel confident the lighter maple contrasts well with the stone, blackwood and ebony as well the light coloured maple accentuates the colorful central stone section. The darker vertical ebony accent elements separate the the upper and lower sections of the scaled down structure. This will be the fourth sculpture where I combine wood and stone and I am enjoying the process as well as the resulting work.

Thursday, February 10, 2011

Mixed media sculptures (1)...

An opportunity came up recently to create two sculptural pieces for an exhibition. I decided to continue with the mixed media approach once again, incorporating wood and stone in this piece. I had free reign to create anything I wished without the constraint of following a theme. I decided to work with wood I had on hand as I find it too easy to overlook wood I have stockpiled and instead go out to purchase more, sometimes I feel like a chipmunk or a squirrel, continually stockpiling wood. A good habit to have, it's just that the earlier acquisitions seem to get forgotten in light of the new acquisitions. I decided to have curves in these sculptures to accentuate the beauty of the woods I have selected. The woods are figured big leaf maple, blackwood and ebony. The stone pieces constitute the mixed media part of the sculptures.

I also decided to depart from any of my previous sculptural work and create work which is a little more exciting and focused. I made some preliminary sketches and began to get excited about creating the sculptures as I fine tuned the sketches. The big leaf maple is very pleasant to work with and contrasts well with the dark blackwood and ebony. The sketches portray the image of a shrine or at least in my mind I envision a shrine or a symbolic gathering place. I really like to see how well the stone integrates with the wood as they are both natural elements in nature, in this case they complement each other fairly well I would say. This is the frist of the two sculptures, the next post will have the other sculpture. Although I am not following an exhibition theme, I somehow managed to create a theme for these two sculptures...

Sunday, October 31, 2010

Elements

I had a desire recently to create a sculptural piece which combines a few of the natural elements which surround us. I decided on wood ( my primary medium) along with metal and stone. With this in mind I had to somehow combine these three elements into a small sculptural piece of art.

Typically, I use what I have available in my studio for smaller works unless I absolutely have something else in mind which demands other material. A little searching through my inventory of materials, I found what I needed. Metal rod, some stone pieces, and a very nice fairly hefty piece of figured big leaf maple.

These materials have specific dimensions associated with them, so the next phase is how to combine these materials into a sculpture which brings forward the vision I have in mind. The vision is to somehow demonstrate how three different elements can come together cohesively. A few sketches and design iterations later, and it came to me on how to put this all together. Next came the technical aspect of the creation, how to attach three completely different elements together as well as sculpting the main wood body into the desired shape.

The result is above and judging from initial feedback I have received, it is not bad as a sculpture. I enjoyed the process of designing and creating this particular sculpture as it presented some challenges to my skill set. This is the first time I have combined these particular three elements into one piece and hopefully I will be able to use this experience to continue exploration into these alternative mediums.

Thursday, July 22, 2010

Slice Of Nature

I recently decided to create a small sculpture and wanted to maintain the characteristics of the woods as much as I could. I like to work with woods I have on hand and in this case I had a small block of beautifully colored and figured mesquite and a chunk of blackwood available to me. The blackwood had a live edge ( very light bark still there) so it made for an interesting contrast with the dark portion of the wood. The mesquite had an interesting characteristic in that it had existing fissures and cracks which somehow made the wood more appealing to work with. Since the theme of the sculpture slowly evolved into "A Slice Of Nature" I thought it best to maintain as many of the characteristics of the two woods as possible.

I decided to use the mesquite as the base of the sculpture and the chunk of blackwood as the upper part. A few sketches later and a rough vision of the intended sculpture began to emerge. Since the sculpture was to be as natural as possible I minimized the shaping which needed to be done to merge these blocks of wood together. The blackwood with live edge depicts a slice of the tree ( bark included) and the mesquite base (with cracks and fissures) depicts the particular mesquite tree ( warts and all) used in this sculpture.

The finish is thinned shellac to maintain the natural tones and colors of the woods. Each time I stare at this sculpture I think of the tree the blackwood originated from and the great contrast between the figured mesquite and staid blackwood above. The blackwood with live edge brings home the fact that this piece of wood is straight from a tree.

Saturday, June 19, 2010

Hidden Treasure

Recently I tasked myself with creating a sculpture for an upcoming exhibition in a gallery I am a member of, a piece which would blend in with the theme of the exhibition, "Little Gems". The inspiration of creating art is often hit or miss, great inspiration appears in view or no inspiration for a while. Having an exhibition theme to work with helps the process of deriving inspiration. I slowly began to sketch out some possibilities for this sculpture with the theme in mind. Since I intended to create the work with some interesting, unusual wood I have on hand, this also became a criteria for the piece. A few iterations back and forth between sketch, drawing and approximate size and suddenly the piece I had in mind began to take shape.

I like to work with contrasting woods and with this in mind the sculpture slowly began to take shape. This particular sculpture is composed of three pieces which need to mate correctly. I very often utilize non-standard angles and curves in my work so part of the process is to device ingenious methods to attach the pieces of the sculpture together. Having done this, the rough sculpture slowly evolves into a fine, polished sculpture. The sculpture is named "Hidden Treasure" and depicts a gem or diamond hidden or captured between dark walls. The gem itself is of curly maple whereas the walls are of cocobolo. I enjoyed the process of creating this sculpture and look forward to creating more of this type of work.

Wednesday, March 31, 2010

Wall cabinets...cont'd

I last wrote that I was completing a second identical wall cabinet. This has been done since with not too much difficulty. The difficulty was raising the cabinets to the proper height for attaching to the walls. I devised a setup utilizing my rolling shop cart and a spacer which consisted of a wood crate that happened to be very close to the correct height. The rolling cart has lockable casters and this helped considerably. The cabinets are quite heavy since they are mainly composed of baltic birch ply although I lightened some components by using solid poplar and cherry shelving and the doors are fairly light in comparison to the cabinet. I snapped the picture at an angle to display the reinforced corner joinery which consists of long screws capped with contrasting wood plugs. The corner joints are rabbeted and glued together.

I decided to apply light , thinned tung oil to the cherry door frames to both protect the joinery from any moisture change and to keep the wood from staining and attracting dirt. These frames will slowly develop a nice aged cherry look with a patina. My next challenge was attaching the cabinets to the different walls. I gave some consideration to the weight of the cabinets and the tools I would be placing in them and decided on a mounting rail. The mounting rail is installed in the interior of the cabinets at the very top where the top and back intersect. I used hardwood cherry for this and glued and screwed it to the cabinet through the top and then attached the cabinet through the cherry mounting rail to the wall studs using large wood screws. I also screwed the back into the wall studs along the length of the back.

I like to remove any doubt as to the strength of the hanging cabinets as you can see. On the other cabinet I also installed a hardwood cherry cleat below the cabinet and into the wall studs for additional strength but realized afterwards it was not really necessary. It was enjoyable making these cabinets and I now have so much more room for small tools and hardware in my studio. It's great when everything works out as planned!

Sunday, March 28, 2010

Wall cabinets...

In the past two days I have been working on two wall cabinets for my studio. The cabinets are intended for small tools , marking gauges, small hardware and odds and ends. There is never enough cabinet space for all this, as I'm sure many of you can attest to. My final design is based on a certain depth, width and height of the cabinets. There are existing wall mounted cabinets in the studio and as part of the criteria I wanted these to be of the same approximate width and height size only deeper. This was arrived at by using the maximum depth allowable without the cabinet interfering with any activity I might be performing nearby. I also opted to have two doors on each of the cabinets instead of one wider door, this made much more sense and would eliminate any issues with wide, swinging doors interfering with anything close by.

I will build two of these cabinets since I would eventually need another and the extra effort in creating a second cabinet is far less when they are made at the same time. The cabinet itself is assembled with dimensionally stable baltic birch plywood. The joinery is rabbets in the corners reinforced with plugged screws. The shelves ( 2 per cabinet) are housed in dadoes within each of the side panels. I applied solid cherry edging to the functional edges of the baltic birch plywood primarily for aesthetic reasons since I intend to have the door frames of solid cherry. These cabinets were designed and created with a small budget in mind, and since they are somewhat utilitarian I did not want to spend needless amounts on top grade wood. In fact, I used some cherry seconds I had in my lumber pile.

The door panels are thinner baltic birch pieces. I cut the best pieces from a larger piece of baltic birch ply for these panels, focusing on the lighter colour and appealing graphics to complement the cherry frame. The panels are inset into grooves in both the rails and stiles. The door frames are assembled using dowels. I took extra time to select better grain orientations for the long stiles to eliminate any twist possibly causing the doors to warp. I also installed solid edging on the shelf fronts to create a uniform cherry appearance once the cabinet doors are opened.I decided to use piano hinges to attach the doors to the cabinet since I already had a few of the piano hinges and I wanted both cabinets to be identical. More on the cabinets and I will have a photo of one of the cabinets mounted on a studio wall once the second cabinet is completed.