Saturday, December 8, 2007

Drawer case (2)...

My last post had me preparing the individual panels which comprise the drawer case. After hand planing and scraping the surfaces I temporarily assembled the panels and confirmed that the drawer case is perfectly square. More importantly, the dado grooves (dadoes) are perfectly lined up in the horizontal plane for each level of drawer. I return to all the checking and re-checking of measurements I performed before creating the dadoes to assure these dadoes would line up correctly. It is also important to have the individual panels perfectly square.

At this point I glued and clamped the panels together. A short time later, the clamps are removed and the fitting of the drawer dividers begins...

In the photo, the horizontal dividers are composed of a leading part of cherry and the back part is alder. I'm using alder as a secondary wood in this application. The drawer dividers are utilitarian for the most part except for the leading edge which needs to be consistent with the other panels comprising the drawer case. I've set the edge between the cherry and alder significantly behind the leading edge of the drawer case to be practically unnoticeable. The seam between the cherry and alder is also lightly hand planed and scraped prior to assembly.


I test fit the assemble drawer case into the main armoire case. This is a great example of a case within a case. The drawer case will be pinned to the main case at the bottom, but the remainder of the drawer case will not be attached to the main case. This was another design consideration on my part. I have much more freedom in the design and execution of the drawer case if it is built independently of the main case. In a earlier post I might have mentioned that I'm designing the drawers so they can be individually removed and set onto the drawer case, much like a silver chest design.

In the next few days I will begin assembling and preparing the wood to be used for the drawers, of which there are eight. The drawer front will be half-blind dovetailed to the drawer sides and the drawer back rabbeted and pinned in with a lower groove for the drawer bottom panel. I'll be using a contrasting wood to the cherry drawer fronts. I'm also going to work at getting the graphics of the drawer fronts both continuous and in harmony, this involves quartersawn pieces of cherry. Initially, I will lay out the dovetails both to be aesthetically pleasing and in scale with the drawer pieces. In my next post, I hope to have a dovetail layout I've decided on. It has been a while since I sat at my bench and made dovetail joints, I'm looking forward to this..

Thursday, December 6, 2007

Drawer case (1)...

I'm in the process of milling and preparing the components of the drawer case. The drawer case consists of a top and bottom panel the width of the interior of the jewelry armoire, two side panels , the back, the horizontal drawer dividers, and a center vertical divider. After preparing the surfaces of each of the panels of the drawer case, I created a series of grooves to house the drawer dividers. The grain orientation of the drawer case is front to back, as is the main case, so the grooves are perpendicular to the grain orientation and are therefore dadoes. When creating dadoes such as these, it becomes somewhat important that their spacing is equidistant from each other and that the sides of each drawer compartment are parallel to each other. I took a considerable amount of time checking and re-checking my measurements,markings, and reference edges before creating the dadoes and any joinery used to keep the drawer case together.

In the photo, I am very lightly planing both surfaces of each of the panels to create a nice, smooth, polished surface, using a planing board. I had already done some of this hand planing prior to creating the dadoes, but the final hand planing cleans any residual ridges on the surfaces. The panel being planed is the center vertical divider, the other panels in the photo are the left and right vertical panels. The drawer case is of black cherry just as the main case. The panel being hand planed was partially covered for a few days and this caused the exposed area to darken considerably as opposed to the lighter portion. Cherry darkens considerably and develops a patina with exposure to light and ambient air.

Within the day, I will be assembling and gluing together this drawer case and fitting the individual drawer dividers. I have also test fit this drawer case into the main armoire case to confirm my previous measurements were correct. The drawer case will be for the most part floating in the main armoire case. To accomplish this I will be pinning the drawer case to the base of the jewelry armoire with four small dowels to prevent it from moving, yet it can be removed if necessary.

Tuesday, December 4, 2007

Drawer case mockup...

Since the main case is fairly complete, I've begun to create the inner drawer case. The first step in the sequence is to get the proportions correct using a cardboard mock up of the drawer case. After a few iterations, the mock up in the photo is the preferred layout. The design considerations which I used are as follows:

Height of the drawer case
Number of drawers
Width and height of individual drawers

The cardboard mock-up is a very important step in my opinion, as it serves to both provide a visual image of the drawer case and to point out any possible subtle issues with the layout. The drawer case is set back from the edge of the main case to allow for drawer handles and a little extra for the armoire door stops. The drawers can be removed and individually placed on the top of the drawer case for better viewing. I debated whether to overlay the horizontal drawer dividers with the door fronts, but since all the wood is uniform and of the same species ( cherry), I will have the horizontal dividers visible. The components of the drawer case are for the most part dadoed and rabbeted together and the horizontal dividers will each slide in between two grooves. The center vertical divider will be permanently attached to the drawer case. The rabbeted sides will also have a couple of dowels in each of four edges for reinforcement.

Since the cardboard mock-up is sized exactly to scale, I have the benefit of using it to size the components of the drawer case for milling and dimensioning. At this point, I have precut the boards I will use for the drawer case and am allowing them to stabilize before any further processing, to remove any inner stresses in the wood.

The individual drawers will have dovetailed drawer fronts and rabbeted backs and the bottom panel will be floating in a small groove on all four sides of the drawer. It will be a few days before I begin to work on the drawers and I'll discuss the detail at that point.

On another note, it appears that my ski season is beginning much quicker than I had planned. We have record amounts of snow here for this time of year and it looks like it's going to stay. It's a winter wonderland out there.

Sunday, December 2, 2007

Doors installed...

I have the armoire case assembled. I'll substitute the word case for carcase from now on, less typing. The doors have been mounted with the knife hinges attached. I don't attach each and every screw to the knife hinge leaves at the moment, only one screw per leaf hinge. This allows me some flexibility if I do need to fine tune the door placement later. The front doors fit well and have a very small gap between the center stiles, very satisfactory at this point. In this photo you might notice the sheen on the case surfaces, namely the left side. This is accomplished solely through judicious hand scraping after assembly of the previously handplaned surfaces, no sandpaper has touched the case surfaces.

I made sure the pin portion of the knife hinges is offset from the edge of the case an equivalent distance, this ensures that the doors swing perfectly vertically. I also made sure to maintain a constant reveal between the edges of the doors and the case edges on both the left and right doors. This also ensures the doors swing plumb to the case.

I now move on to the next step in this build sequence which is creating the drawer compartments in the interior. I'm going to follow the original design loosely and possibly modify some of the drawer widths and the number of drawers. I also need to create the small case in which the drawers are located. This is a great opportunity to use a full scale overlay and create a small mock up of the inner case and drawer assembly, which I intend to experiment with in order to get it just right. I had purposely left the dimensioning of this inside drawer case to a later date to have this flexibility with proportions. I do have one criteria I need to meet, since this is a jewelry armoire, the height of the open space above the drawer case needs to be sufficiently high to allow chains to hang freely.

I'll find some suitable material to form a mock up of the inside case and draw the drawers in full scale. This is a good example of "dynamic design" , a term which I described in a earlier post, since I am going to modify some of the original drawer case design. The original design provided a great outline but now that the armoire case is fully assembled, the proportions can be better taken into consideration for the inside drawer case.

Friday, November 30, 2007

Knife hinges (2)...

I mentioned in the previous post how careful to be when mortising the hinge recesses with hand tools. A good approach is to use a sharp marking knife and sharp chisels of different sizes. I make sure to mark the outline of the straight knife hinge carefully using the marking knife, this creates a tiny notched line which allows me to set the tip of my chisels into. Accuracy is greatly increased using this technique over using a pencil line. The mortise recess itself is created in stages, being careful not to remove too much wood in each pass. Once a substantial depth of the recess has been created, I find the mortising goes along much quicker as there is less opportunity for the chisel blade to skate across the edge of the board. The chisel is tapped in lightly into the marked line, creating sufficient depth to remove each layer of wood from the mortise recess.

Initially, I had placed the door on the already mounted hinge leaves in the carcase, confirmed my measurements and simultaneously made a secondary mark or notch of where to orient the door hinge on the edge of the door. After creating the initial depth of the hinge mortise, I test fit the door to the already installed hinges on the carcase by sliding it in and confirming my markings are correct. You can see I spend a considerable amount of time confirming all measurements and markings are correct since it is not a simple task to correct any of this afterwards as the hinge mortises are already created. This is probably a good place to have practised these steps on some spare boards to get it right.

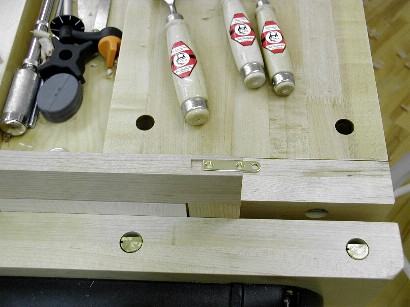
In the photo above, the knife hinge leaf is inserted into the mortise. The depth of the mortise should be equal to the thickness of the knife hinge leaf, in this case 1/8 inch. I'll continue on with these steps and install and adjust the doors so they are both plumb, level and spaced evenly to both each other and the carcase itself.


It looks like we've been hit with an early winter up here, typically there is little snow on the ground before Christmas. I've taken up downhill skiing again after many years and I'm kind of glad to see the snow, planning the first ski trip already.

Wednesday, November 28, 2007

Knife hinges...

I've spent a little time ensuring the front doors were square and true to the carcase, this involved some judicious hand planing along the outside edges of the door frames where I had purposely left a fraction of an inch of extra wood. I'm preparing myself for the next step in the build sequence which is installation of the knife hinges. I typically use knife hinges in a cabinet such as this. Knife hinges are strong, fairly hidden, elegant looking, and traditionally used in smaller cabinets such as this jewelry armoire.The knife hinges come in pairs , one pair per door. Knife hinges are available in two formats. In this project, I've chosen to use straight knife hinges since the doors overlap the carcase. An L-type or offset knife hinge would have been used had the doors been rabbeted or recessed into the carcase edges instead. The straight knife hinge is by far the easiest of the three to install.

The installation consists of mortising hinge recesses in the base and top of the armoire, one per hinge. A complementary recess is mortised into the top or bottom corner of the door frame, again one per hinge. Accuracy is key with knife hinge installs. In the photo above you notice a small spacer behind the knife hinge. This spacer has been measured from the edge of the carcase to the leading edge of the hinge on the door itself. A good reason for using this spacer is that I want to leave a consistent reveal between the rear edge of the door and the carcase edge. In my case, I've decided to leave less than 1/32 inch. This 1/32 inch is combined with the thickness of the remaining wood after hinge is centered on the door. The spacer makes it easy to mark where the hinge should be installed. The other mark for the hinge is the width of the knife hinge itself, or 3/8 inch in this case. The same spacer is used on each of the corners of the carcase.

Hinge installs on the tops and bottoms of the door frames are fairly straightforward. The center of the door frame is used as a reference and the hinge mortise is equal on either side, in this case approximately 3/16 inch. As a precaution, I fit the doors back into the carcase and confirm the outline of the door part of the hinge using the base or top hinge for a reference. Another important consideration is to create each mortise in a straight line and parallel to the carcase or door frames. The depth of the mortise is the thickness of the knife hinge leaf. The hinge pin straddles the corner, however this can be adjusted later in the fitting of the doors by sliding the hinge in or out a fraction of an inch..

I mortise the hinge recesses using a set of bench chisels, and much prefer this method. This method also allows me to install the knife hinges after the carcase is assembled which results in a more accurate installation. If there was a time you ever needed to exercise patience in woodworking, this would definitely be it. Carving out the mortises is a somewhat slow , tedious process, but as you can see the results are very satisfying. You will need very sharp chisels if you use this process. I've completed four base and top hinge installs, next are the door frame mortises and hinge installs. Afterwards, I install the doors and adjust.

I'm anxiously awaiting the final installation of the doors, afterwards I can move on to working on the interior of the armoire. The interior drawer section involves more detailed work.

Sunday, November 25, 2007

Dynamic design...

I alluded to the term "dynamic design" in a previous post. This is a term I have coined to describe how design doesn't necessarily need to be cast in stone but instead can be modified as a project progresses. The changes I refer to are often subtle changes and not large scale changes. One of the meanings for the word "dynamic" from the American Heritage Dictionary.

dy·nam·ic - Characterized by continuous change, activity, or progress

As a piece of furniture is being handcrafted, sometimes the design we originally envisioned can be improved on at different stages, or the original design can remain as is. Having this flexibility provides a continuous excitement for the furniture maker along with the benefit of improvising on the original design after seeing the furniture piece at various intermediary stages.

An excellent example is the original design of the door frames. I had chosen to form the vertical stiles a little thinner than the horizontal rails to accentuate the horizontal lines running across the door frames into one continuous shadow line.The other design element was the angled horizontal rails. After mocking up the door frames with panels inserted I found these to be a unnecessary details as the focal point of the doors is fundamentally the figured door panels. Often, too many design elements take away from the focus of a piece ... I believe in leaving as few detail elements as possible to have the major element stand out. I have left the door frame members instead at the same thickness, this only really made sense to me after having dry fitted the door frames and panels and applied to the armoire as the photo in an earlier post.

So here we have an instance of what I like to call "dynamic design", sometimes the beauty of a design is in its simplicity. Simplicity is one of the tenets of the minimalism philosophy. I have to admit that I am a fan of "minimalism", and have read one book on the subject so far. You tend to gain a different perspective on design after being exposed to the minimalism philosophy.

Saturday, November 24, 2007

Door detail...

In the previous post I mentioned I was going to discuss the rabbet detail at the edge of the doors where they meet. To create the overlapping rabbeted edges without adding any stock and making it appear as an afterthought, the rabbeted edge profiles are formed from the door stiles themselves. Since the inner door stiles have been designed to be, in this case 1 1/2 inches wide, rabbeting one or the other would reduce this width of stile by the width of the rabbet and in the process cause the door stiles to look a bit off. I also want the right door to overlap the left door with the assumption that the right hand door is typically the first one to be opened.

The techniques I use is to create the left door middle stile at 1 3/4 inches and keep the right door middle stile at 1 1/2 inches. The overlapping, complementary rabbets, once created, will leave both stiles at 1 1/2 inches width. Design dilemma solved!

The primary reason to have these overlapping rabbets is both a form and function issue. Wood doors tend to expand and contract with seasonal change, although much less with this frame and panel design, but nonetheless there is a small gap that narrows and widens where the doors meet. The overlapping rabbet handles this very well, providing wood behind the small gap resulting in no glaring gap between the doors and the doors interlock. These two features justify this extra step. In the photo above the rabbet detail can be seen and the door stile widths are once again of the same width, or at least the visible parts are.

Thursday, November 22, 2007

Door fitting...

I've gone ahead and rabbeted the door panels to fit the groove surrounding the inside of the individual door frames. I perform the bulk of this rabbeting on a router table and make the last passes with a small shoulder plane to have the door panel fit accurately within the groove. At this junction, I have the tiger maple door panels rabbeted and the door frame components prepared. There are alternative methods of joining the stiles to the rails such as dowels, a slip joint, or a half lap joint. In these cases, there would be a need for stopped grooves in either the rails and stiles or in both. I decided to use the traditional mortise and tenon with haunched tenon to join the rails and stiles, this allows me to have the grooves running the full length of the frame members.

The panels were purposely left a fraction of an inch proud of the surface of the rails and stiles when I prepared them earlier. As a sanity check, I intend to fit each panel in its frame as a dry fit and then determine how much more I need to reduce the thickness of the raised part of the panel. This is an extra step, possibly unnecessary, but it leaves me with peace of mind that the panels are exactly flush with the door frame members.
Someone earlier asked to have more information on the rabbet detail where the doors meet, something I referred to in an earlier post. I'll describe it in my next post and also post a photo of the detail. In the photo above, I have the doors glued up with panels in place. Part of the design was to have as small a reveal as possible between the panels and the door frame rails and stiles, this to give the effect of a thick black shadow line surrounding the very light maple panels. I'm very satisfied with the result and from a few feet away this effect is obvious. It was necessary to get the reveal just right and spaced correctly all around. I'm going to spend some time now trimming the doors as I had left some corners with a fractional overhang as a safety margin.The combined width of the doors is wider than the sides of the armoire and I'll explain the logic behind this in my next post along with a paragraph about "dynamic design". The armoire is coming along nicely and beginning to take shape.


If you look out the window just behind the workbench you can see snow. Yes, we had an early winter snow storm up here this past day. Nonetheless, it was nice and toasty in the studio today, something about a pristine snowy setting that makes being in the studio that much more enjoyable.

Wednesday, November 21, 2007

Figured panel prep...

I'm preparing the tiger maple panels prior to assembly of the door frames. This type of highly figured wood can be quite a challenge to handplane to a mirror finish. The wood can easily tearout if the angle of attack of the plane iron is not quite right or if the blade is not sharp. There is also technique involved. In the photo I'm using a high angled handplane which more or less falls in between a handplane and a scraper. I choose this tool to eliminate any possibility of tearout with a degree of certainty. After this operation of smoothing the board, I use a scraper to burnish the surface and eliminate any small streaks from the handplane operation. You can see the degree of curl in the tiger maple, since the curls are fairly tight, the wood borders on fiddleback maple quality. The curls are not very pronounced at this point except in the correct light, but once a clear, deep finish is applied, the curls will pop and appear quite dramatic. I'm taking my time with this step to prevent any tearout from occurring as the two panels , although replaceable, are fairly important at this stage.

My next step after preparing the surfaces of the panels will be to rabbet the outside edges of each panel. The rabbet will match a groove in both the rail and stiles of each door panel. The reveal around the edge of each tiger maple panel and between the panel and door rail or stile needs to be uniform all around, a bit of a time consuming step to get just right.

I'm going to place the panels against the individual door frames, to have the door frame overlay the tiger maple panel, as this will allow me to adjust the graphics of the panels within the door frames for optimal effect. Once I've selected a nice pattern to capture, I'll scribe the outline on the panel and create the edging with this outline as a reference. Hopefully, in my next installment I'll have the door frames completely assembled and glued up.

Monday, November 19, 2007

Door frame sizing...

After discussing with the client, they agreed to give me artistic freedom on the door design. I spent some time working on the frame components of the individual door frames , and I've progressed as far as fitting the door frames into the carcase for test fitting. The door frame components, rails and stiles, are joined with conventional mortise and tenon construction. My natural inclination is to have the stiles on a door frame extend top to bottom of the door and I usually don't think twice about this. Borrowing a page from James Krenov and one of his older designs, I decided to instead extend the top and bottom rails the full width of the door frames instead. The lines become horizontal now rather than vertical. I'm also going to set the vertical stiles back a fraction to provide a shadow effect and give the appearance of horizontal lines running continuously across the top and bottom of the doors.

It is preferable to make a mock-up of the door frame configuration but I did the next best thing and drew the new design and applied it directly to the carcase of jewelry armoire as in the previous photo. I'm taking a blind leap of faith at this point and basing the success of this modified design on a photo of an existing, but different cabinet along with my modified drawing.
At this point, I like the lines of the door frames and panel area and have decided to proceed and prepare the figured maple raised panels. I need to be judicious with this step as the reveal around the raised panel and the door frame needs to be uniform on four sides of the panel. I'm also implementing a cool rabbet between the door frames to have them overlap and not reveal a gap when the door frames expand and contract with seasonal change in humidity and temperature.


A photo of the figured maple door panels will be posted next, after I rabbet the edges and begin to fit them into the door frames. I'm kind of excited at this point and am looking forward to what the completed doors on the carcase look like. It's easy to rush things when anxiety sets in, and patience is a great virtue during some of these delicate and accurate fittings. Steps need to be followed in the correct order before the doors are glued together. Early on when the sketching of this armoire began, one of the proposals was to have one piece veneered doors. A good design alternative, it allows the full width of the individual doors to feature a nicely figured veneer without frame components taking away from the space. Another small advantage is the increased dimensional stability a multiple ply substrate with veneered surfaces provides. I'll be exploring this technique in future designs.