 After a few days delay I continued the shaping process for the pulls and fitted them to each of the drawers as well as the right-hand door of the cabinet. To maintain consistency and harmony I oriented the pulls in the same way, with the lighter color at the right of the drawers. Locating the pull mortises is an important step since the pulls need to be located similarly on the drawer fronts or it would be kind of obvious something maybe went wrong. At least this is my thinking. I carefully marked the mortises and checked their locations with the drawers in their respective drawer compartments. The pulls fit into the mortises with a snug fit as this is my goal.
 Afterwards, I fitted the remaining pull to the right-hand door of the cabinet. To get away from absolute symmetry and to make more of the door graphics visible when looking down, I located the door pull slightly lower than center. After installing this door pull, I feel I have succeeded in this effect. A single door pull confirms that it is the right-hand door that needs to be opened first, as the door lip orientation demands this. Having a single door pull also creates a cleaner cabinet front and evokes uniqueness, mystery and a non-conforming design, since the large majority of cabinets in existence have two pulls. Next, I continue scraping the interior to a point where I can begin applying finish. As well, I need to create an edge treatment at the front of the tops and bottom of the cabinet. I had purposely left this until now in case I needed to perform any trimming of the front of the top and bottom. The edge treatment will be a small chamfer which is continuous with the sides of the cabinet. Any trimming is better determined with the doors in place.
 I've been working on the drawer pulls since my last post. This involves designing the pulls, selecting the preferred wood to use for the pulls, deciding on a size for the pulls, laying out the pulls, and shaping them. I have to admit this is one of my most enjoyable processes. Pulls often add considerably to a cabinet both in aesthetics and design. The pulls are often a draw to the cabinet if they complement the cabinet yet impart a unique addition to the cabinet. The pull design I came up with is a rectangular one with a tenon extending out. The pulls are of mixed cocobolo so both heartwood and sapwood create a nice contrast in colors. The tenon has shoulders on four sides to overlay the drawer front. This tenon fits into a matching mortise in the drawer front. The mortise is marked and created using hand tools, namely small chisels.
 Creating the tenon is meticulous work and I used a small, fine saw to delineate the tenon from the actual pull area. Once this is done, I use a skew rabbet block plane and some small chisels to shape the sides of the tenon. The important part of this sequence is to accurately mark the mortise to fit the tenon. A mistake here could ruin the drawer front or involve a re-design of the pulls to correct the error. The tenons of the drawer pulls fit tightly into the mortise and then glued in. I also take some time to orient the drawer pull graphics and orientation to match each other.
After completing and installing the three drawers pulls I proceeded to the right hand door of the cabinet. This door pull is similar to the drawer pulls to maintain harmony in the design. This design involves one pull on this door to distinguish this door as the one to open first. I've always liked the idea of having a single pull on the cabinet front, it just looks like a clean, minimalist design. This door pull is also slightly offset towards the bottom of the door to minimize any impact it might have on the door graphics as more of the door graphics are now visible above the door pull.
 Creating and fitting the drawer bottoms was the last step for me in the drawer creation process for the cabinet. The conventional approach for installing drawer bottoms is to create a groove in each of the sides as well as in the drawer front. These grooves are carefully marked to maintain enough material below the groove while keeping the groove itself as low in the drawer as possible. Another consideration in the location of these grooves is to not affect the dovetail joint, or at least the visible part of the joint. Once this is performed I needed to create the drawer bottoms.
The drawer bottoms fit into the grooves in the sides and drawer front. The drawer bottom is accurately fitted so the grain orientation is from front to back. This allows the drawer bottom to remain tight in the grooves and instead any movement is directed towards the back of the drawer bottom. The thickness of the drawer bottoms is another consideration. I wanted to maintain strength in the bottom but at the same time make the bottoms fit into the narrow grooves. This is accomplished by rabbeting the drawer bottoms to fit the grooves while the rest of the drawer bottom remains thicker, in this case a little over 1/8 inch thicker. The rabbets are also created while maintaining a small reveal in the two sides and the drawer front. This can be seen in the above photo. The drawer bottoms are now strong, fit tightly, are replaceable, and are pinned to the back of the drawer. The drawer bottoms are loosely pinned to the drawer backs to allow for wood movement.
Next I will continue to fine tune the fit of the drawers into their respective drawer compartments and then I will create and fit the drawer pulls.
 I completed the dovetails for each of the three drawers and began the meticulous work of assembling the drawers and fitting them to their respective compartments in the cabinet. Sometimes when I begin to saw and carve out dovetail joints I can go on and on, it is such a peaceful and fulfilling process. I never tire of staring at very good, tight dovetail joints. A few of the steps involved in assembling and fitting drawers are fitting the drawer sides to the drawer fronts. The sides need to be square to the fronts in two planes.
I created rabbets in each of the drawer sides as well as the fronts of each drawer. The back of the drawer has an opening which allows me to slide a custom fit drawer bottom in and pin it to the drawer back. This is a time-proven technique which allows me to replace the drawer bottom if necessary at some point in the future. It also allows for wood movement as the drawer bottom grain orientation is front to back and such is not placing any undue stress on the drawer itself.
The fitting procedure is a bit time-consuming as this is part of the process and a necessary one. I have a couple of the drawer dimensions ever so slightly oversize to allow me to tune the fit to the compartment. Better slightly oversized than undersized. I handplane the sides down to fit the compartment and lightly trim the top and bottom as well. One of the drawers to the right has a lower lip which also needs to be tune to the bottom drawer top, to create a minimal gap yet provide an allowance for wood movement. The drawer bottoms, which I have yet to create, will have rabbeted sides to fit the drawer grooves. This allows me to maintain a thicker drawer bottom yet rabbeted to fir the sides and front of the drawer. I'll continue on with this procedure and begin to give thought to the drawer pulls.
 In the last post I had designed and created the three drawer compartments. Since then I have cut the parts for the individual drawers and begun the process of dovetailing the fronts to the sides of the drawers. Fitting of the drawers into their respective compartments can be a time-consuming process. Instead, by carefully measuring the parts to more precisely fit the compartments, much of the final fitting is reduced. This is my approach, I mark and measure precisely and then lay out the dovetails. In this case I went a step further by creating a test joint using similar components as the actual drawers. I do this for a couple of reasons. One is to determine the best dovetail placement and spacing and secondly to prepare the two marking gauges and the divider I use to mark and create the dovetails. The dovetails are of the half-blind type, referring to the fact that the tails are hidden or set back in the pins. This type of dovetail hides the joint from the drawer front face and is more elegant than through dovetails.Creating dovetails is an enjoyable process and a few precision tools are involved: different sizes of chisels, a fine dovetail saw, marking tools, a small block plane, etc. In one case, a drawer has a small lip overhanging the drawer divider so there is more of a challenge with this particular one.
There is little to no margin for error as the joints need to be perfectly fit. The pin marking need to be offset from the bottom by the width of the overhang or lip. I make most of the adjustments of the dovetail joints within the hidden part of the joint.In the photo you can see one complete drawer, a smaller test drawer and the components of another drawer being prepared.
 After tossing around different designs for the interior of the cabinet I decided on one particular layout. I had used this layout on a previous cabinet and like it. What I like most about it is that the drawers and compartments are equally divided between the left and right side of the cabinet. I can open the right hand door and have access to two drawers and the shelf above it. This cabinet is primarily designed as a showcase cabinet and I would imagine it to be used to display art objects, small sculptures, etc. With this in mind, I want to leave as much room above the drawers as possible, or maximize the open height of the interior of the cabinet.The drawer compartments are pegged to the cabinet interior which ensures they will move with temperature and humidity variations. Since the cabinet sides, top and bottom panels are veneered they will hardly be any wood movement with these panels. The drawer compartments however are of solid wood and it is expected they move with the seasons. My approach is to simply peg them into the cabinet, attached at single points. This technique has worked well for me in the past, essentially separating the interior compartments from the exterior carcase.The top drawer on the right hand side will have a lower lip to overhang the drawer divider. The drawer fronts will be of cherry and dovetailed to the sides.I just want to mention that the drawer openings need to be perfectly, or close to perfectly accurate in height and width. As well, these drawer openings need to be completely rectangular to be able to have the drawers fit well. I take extra time to ensure these parameters are met.
 I left off with having completed the mortises for the knife hinges, both in the cabinet doors and in the cabinet itself. The fit is very good with a consistent reveal all around the doors and from the cabinet sides. There are many variables with fitting the doors at the center where a lip and rabbet meet, so I usually just take these measurements after the doors are hung correctly. I had left some extra solid wood along the inside edges of both cabinet doors specifically to be able to shape them into a rabbet and lip. The lip will be on the right hand door as is fairly standard and the rabbet on the left hand door. The lip and rabbet combination work really well at keeping the gap between the doors closed as well as providing a stop for the right hand door.In the upper photo I am creating a rabbet on the left hand door. I use a skew rabbet plane for this and it works very well in this application. There is a fence on this type of block plane which allows me to set the depth of the rabbet. I began by marking the center at which both doors meet and using that point as the center of the rabbet and lip joint. I typically work one door, mount it and then measure the opposite door. This process is repeated a few times to get everything just right.
 The photo at the left shows the completed joint after some final tuning to allow for a small amount of door movement. I can't stress enough to plan before making any cuts, especially when creating knife hinges and fitting doors. Mistakes are all to easy to make and extremely difficult to undo. Not that I've ever made any, ha...Next I develop a design for the interior compartments and drawers. I have had a design in mind and I'm going to pursue this. Once the compartments are laid out I can begin to plan the drawers. I'll be cutting up some maple for this part in the next day.
 Most recently, I've been working at creating the mortises for the doors. Accurate measurements are critical for this fitting and I typically measure and re-measure before even beginning to chisel out the knife hinge mortises. I dry fit the cabinet sides, top and bottom and then use a spacer I created as part of the fitting process to transfer the hinge mounting offset to the top and bottom panel. This is the offset from the side panels to the hinge in the door. As well, I transfer the length of the hinge in the door panels to the top and bottom.Once I have this particular measurement marked out on the cabinet top and bottom for both doors I can use the hinge itself to mark the opposite, parallel side of the mortise. A short time later and the mortises are completed in the top and bottom panels. The next critical test is dry fitting the door panels and knife hinges into the cabinet. This part is successful. I have left a little extra in each door panel where they meet in the center to allow me to fit them so the rabbeted ledges will meet correctly. I'm also very happy with the choice of graphics in the ambrosia maple veneers I have chosen. I need to perform some final fitting of the mortises, very small adjustments in the hinge placement withing the mortise itself. I had purposely left the length of the cabinet mortises a fraction of an inch short so I can dial in the placement of the doors. The very small reveal at the top and bottom of the doors needs to be perfectly parallel with the respective cabinet top and bottom panels. Once I have this done I will begin the cabinet glue up process.
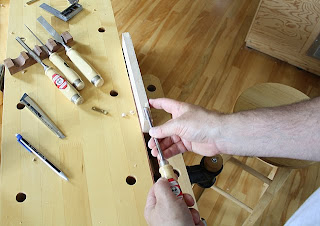 After the doors are fitted into the cabinet opening the next step is to layout and create the hinge mortises for the knife hinge pairs. Each door has one pair of knife hinges as they come in pairs. I use spacers and my small adjustable square to make certain the doors are spaced uniformly from the cabinet case. This is important as the door reveal all around needs to be uniform. After the hinges mortises are marked the process of creating the recesses is accomplished with a set of sharp chisels and a small mallet. Once the hinges mortises have been created on the doors, the hinge markings are transferred from the doors to the cabinet to maintain accuracy.I do this with the use of a spacer. The spacer allows me to maintain the same reveal of the door from the cabinet sides. Creating the hinge mortises with hand tools is somewhat of a pleasant task although it can take a while. Care needs to be exercised with grain orientation as the grain is reversed depending on which corner of the cabinet is being mortised. I use both chisel bevel down and back down orientation to remove waste from the hinge.
 The outline of the hinge and its offset from the edge of the cabinet and doors is fairly important, I usually mark this with a sharp knife, then with a wide chisel define the mortise using these fine knife markings. Once this is accomplished, removing material from the recess is fairly foolproof. I remove wood from the hinge recess in stages, exercising care not to go too deep in one pass of the chisel. To the left, a photo of the completed knife hinge mortise on a door, one of four to be completed.
 When I last left off, I had trimmed and prepared the panels for the cabinets. With this task complete, the next step is to test fit the side panels to the tops and bottoms. I use a few loose dowels to assemble the panels together, just enough to keep everything rigid and square. I need to perform this step to both fit the back panel correctly and to fit the front doors. The front doors need to be fit accurately as the knife hinges I am using do not allow much of a tolerance in the gap between the top, bottom and door. I am liberal with the use of blue tape to hold the doors together. This also gives me the opportunity to confirm that the grain orientation and the graphics of the doors are in harmony with the rest of the cabinet. The veneered top and bottom panels provided me the opportunity to make them thicker and in my opinion this adds to the aesthetic of the cabinet in a positive way. I feel good about this design and the proportions...the ratio of height to width I have chosen. I did work with limitations however... namely the available widths of the veneers I had resawn. I can now proceed with marking the knife hinge mortises and then begin the hinge installation process.
I've been away from this cabinet build for a while and hope to catch up quickly now. I've been working on a new endeavor http://www.woodskills.com/ and this has been somewhat time consuming but very enjoyable to me.
 Over the past two years,I have come to use a new term in my design philosophy. The term, "dynamic design", allows me to modify a design to adapt to circumstances, for either technical considerations, or for purely aesthetic reasons. This is a term I have coined to describe how design doesn't necessarily need to be cast in stone but instead can be modified as a project progresses. The changes I refer to can be either subtle changes or large scale changes. One of the meanings for the word "dynamic" from the American Heritage Dictionary. dy·nam·ic - Characterized by continuous change, activity, or progress. As my wood art or studio furniture is being handcrafted, sometimes the design I originally envisioned can be improved at different stages, or the original design can remain as is. Having this flexibility provides a continuous excitement for the wood artist or studio furniture maker along with the benefit of improvising on the original design after seeing the wood art at various intermediary stages. An excellent example is the hall table design in my previous posts. I had chosen to invert the base of the table for both aesthetic and technical reasons. Not to say the original design of the maquette would not have worked, inverting it just simplifies a design dilemma for me and introduces a new aesthetic to the piece. After creating the maquette, I realize I needed to have a fairly stable, strong sub-base to be able to support the V-shaped arch, whereas inverting the base utilizes the points of the arches as legs. Often, we become fixated on a particular design and don't bother seeking out alternatives which often stare us right in the face. Case in point, I have been creating a new design for a smaller wood object, and as part of my philosophy I strive to use as many materials in my possession as possible, without continuously sourcing new material for the components. Working with material at hand sometimes limits what I can do, but on the other hand challenges me to work within certain constraints, in this case certain materials. So here I have an instance of what I like to call "dynamic design", sometimes the beauty of a design is also in its simplicity. Simplicity is one of the tenets of the minimalism philosophy. I have to admit that I am a fan of "minimalism", and have read one book on the subject so far. You tend to gain a different perspective on design after being exposed to the philosophy of minimalism.

 After a few days delay I continued the shaping process for the pulls and fitted them to each of the drawers as well as the right-hand door of the cabinet. To maintain consistency and harmony I oriented the pulls in the same way, with the lighter color at the right of the drawers. Locating the pull mortises is an important step since the pulls need to be located similarly on the drawer fronts or it would be kind of obvious something maybe went wrong. At least this is my thinking. I carefully marked the mortises and checked their locations with the drawers in their respective drawer compartments. The pulls fit into the mortises with a snug fit as this is my goal.
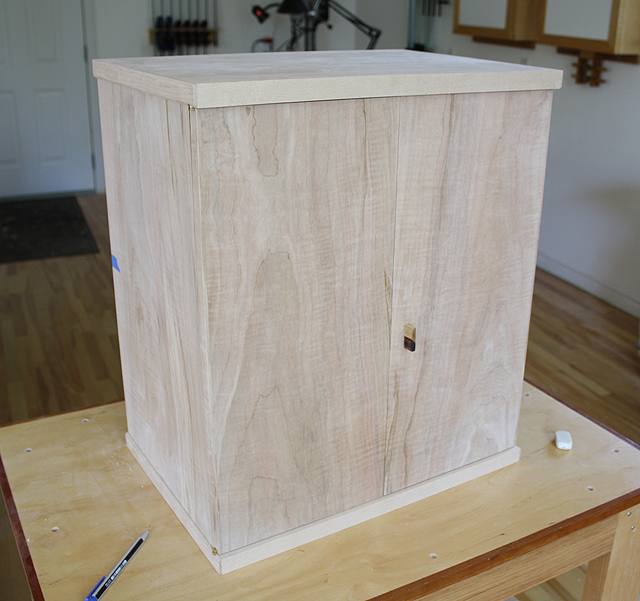 Afterwards, I fitted the remaining pull to the right-hand door of the cabinet. To get away from absolute symmetry and to make more of the door graphics visible when looking down, I located the door pull slightly lower than center. After installing this door pull, I feel I have succeeded in this effect. A single door pull confirms that it is the right-hand door that needs to be opened first, as the door lip orientation demands this. Having a single door pull also creates a cleaner cabinet front and evokes uniqueness, mystery and a non-conforming design, since the large majority of cabinets in existence have two pulls. Next, I continue scraping the interior to a point where I can begin applying finish. As well, I need to create an edge treatment at the front of the tops and bottom of the cabinet. I had purposely left this until now in case I needed to perform any trimming of the front of the top and bottom. The edge treatment will be a small chamfer which is continuous with the sides of the cabinet. Any trimming is better determined with the doors in place.


