Wednesday, May 8, 2013

Video interview at Go Figure! exhibition

I had the pleasure of being interviewed by Liana Voia at the opening of my recent solo exhibition. The goal of this exhibition was to introduce the public to wood as an art form in its simplicity. I enhance the natural beauty of the woods I use. We walked through the exhibition and I spoke a little about each of the pieces in the body of work. Also talked about the inspiration and subtleties of each of the art pieces. This was an exciting evening and a great many people attended encouraging me to move forward with my unique wood art. 

I recall walking in to the gallery and never had the opportunity to even step outside for the many questions I had about my work. This was over a 2 hour period.  The exhibition duration was over a 1 month period and I received many positive comments about the work. The most common comment in my visitor book was that the viewer had never realized wood could be portrayed as a beautiful art form and how wood is under-appreciated. The interview can be seen here:  

http://www.youtube.com/watch?v=YERBbYvp79Q 

To the left is one of my more recent pieces. This piece "Spring Bulrush"  evokes a spring image incorporating light, vibrant colours.

Sunday, March 17, 2013

Art exhibition... Go Figure!

So I've been busy preparing work for my upcoming solo art exhibition. This is a city art exhibition and proposals from different visual artists were juried and a few selected from these entries. The exhibition revolves around a pre-defined theme of which I chose. This theme focuses on the figure of wood. Combining the theme and a commonly used cliche, I came up with the clever Go Figure! title for the exhibition. At least I think it's clever :) The work consists of over 25 pieces of wood art, the majority of which are framed. The individual art pieces each portray an image or vision of mine.. something I see in the graphics of the wood. I use color to highlight different parts of the wood figure and graphics. So each art piece is unique and colored differently. The colors are mine to choose and I worked with a palette of colors which I mixed and created. I have my favorite colors which I tend to use more than others.

The exhibition begins this coming Friday March 22, 2013. Set up is this Thursday and I literally have 4 hours to set it all up. I will have help to do this. I just hope transporting all this work to the gallery works out and nothing is scratched or damaged. It will a relief once the art work is hanging and I'm satisfied with the way it looks. Otherwise, I'm excited about the exhibition and how it will bring attention to the innate beauty off wood. How wood itself can be used as a form of art.

The wood I use is highly figured and in the form of panels which I have created and framed for the most part. A few of the art pieces have been framed professionally and I will make this an option for a client to have this done if they so choose. These exhibitions run for a little over a month and as well there is an official opening party. The exhibition opening party occurs on Tuesday March 26 from 6-8PM. If you're in the area, drop in to both the party or sometime during this month long exhibition. Wish me luck :)

Wednesday, February 27, 2013

Latest news...

As winter slowly draws to a close, the days are getting longer, the sun more intense, and some new birds are appearing at the feeders. I managed to get some skiing and skating in over the winter. Lately I've been busy creating work for a solo exhibition coming up in late March. I had not realized how many pieces of art I would need. So this is what I've been doing lately,...creating work for this exhibition and a couple of other smaller local group exhibitions. The upcoming solo exhibition will feature my wall art while the smaller local exhibitions feature my sculptural work. The photo here was snapped at an exhibition opening in the past two weeks. This particular sculpture "Eternal Flame" is the largest I have created so far and it provided its share of challenges. 

A critical component of my recent art work is the finishing. I use a modified French Polish process which I developed. It is essentially French Polishing with a little time-saving thrown in. French Polishing is probably the most difficult and time consuming finishing technique to master, but the results are well worth it. The feedback I have been receiving is great and encourages me to keep going.

Along with this work I have been designing a couple of new pieces of furniture. The new designs have presented some technical challenges but this is what I like... to be challenged. I'll talk about this in an upcoming blog post. I also have a new logo design for the furniture design aspect of what I do in my studio. Like anything else, I was tired of the earlier logo and it needed updating anyway. Preliminary feedback is good.

Wednesday, December 12, 2012

NICHE Awards 2013 Finalist...

I received an early Christmas present this year. In the past few days I have been notified that I am a Finalist in my "Wood" category at the prestigious NICHE Awards 2013. This is welcome news as the NICHE Awards have long been considered a highly regarded jurying process for both established and emerging artists and artisans. So I received my Awards package this week and as part of the package I have been invited to the  Buyer's Market of Art and Craft in Philadelphia in February, 2013. NICHE holds an award presentation as part of this Buyer's Market of Art and Craft and a Winner in each category is selected from the 5 Finalists. The jury is a renown group of Gallery owners and influential artisans in their own right.

I'm kind of excited about this as I don't know where it will lead. One previous Finalist and Winner mentioned to me that this event is like the Oscars for arts and crafts people. I can live with this! I am planning to attend this Awards presentation and am looking forward to meeting the NICHE people as well as other artists ,artisans  and Gallery owners from all over the US and Canada. I'll post more information as the date gets closer.

Other news. I have just completed a massive update of a Woodworking Course I had designed and created many years ago. The new version can be downloaded and is composed of video lectures. Many weeks of work have been spent on this project but I am very satisfied with the results.

Tuesday, December 4, 2012

Dynamic Design...

Over the past two years,I have come to use a new term in my design philosophy. The term, "dynamic design", allows me to modify a design to adapt to circumstances, for either technical considerations, or for purely aesthetic reasons. This is a term I have coined to describe how design doesn't necessarily need to be cast in stone but instead can be modified as a project progresses. The changes I refer to can be either subtle changes or large scale changes. One of the meanings for the word "dynamic" from the American Heritage Dictionary.

dy·nam·ic - Characterized by continuous change, activity, or progress.


As my wood art or studio furniture is being handcrafted, sometimes the design I originally envisioned can be improved at different stages, or the original design can remain as is. Having this flexibility provides a continuous excitement for the wood artist or studio furniture maker along with the benefit of improvising on the original design after seeing the wood art at various intermediary stages. An excellent example is the hall table design in some earlier posts. I had chosen to invert the base of the table for both aesthetic and technical reasons. Not to say the original design of the maquette would not have worked, inverting it just simplifies a design dilemma for me and introduces a new aesthetic to the piece. After creating the maquette, I realize I needed to have a fairly stable, strong sub-base to be able to support the V-shaped arch, whereas inverting the base utilizes the points of the arches as legs. Often, we become fixated on a particular design and don't bother seeking out alternatives which often stare us right in the face.

  Case in point, I have been creating a new design for a smaller wood object, and as part of my philosophy I strive to use as many materials in my possession as possible, without continuously sourcing new material for the components. Working with material at hand sometimes limits what I can do, but on the other hand challenges me to work within certain constraints, in this case certain materials. So here I have an instance of what I like to call "dynamic design", sometimes the beauty of a design is also in its simplicity. Simplicity is one of the tenets of the minimalism philosophy. I have to admit that I am a fan of "minimalism", and have read one book on the subject so far. You tend to gain a different perspective on design after being exposed to the philosophy of minimalism.

Friday, July 20, 2012

Hall Tables...

I've begun work on a pair of contemporary styled hall tables. They will serve as either hall tables or console tables depending on the application. These pieces are purely speculative and therefore I have the liberty of pursuing some designs I've had in my mind for a while now. The overall dimensions of either of the tables is similar but they differ in style. One of the hall tables incorporates curves in the legs and top whereas the second table has angular features. After some experimentation with sketches, drawings and small models I finalized the designs. I purposely designed these tables to have different styling from each other whereas the aesthetic I am following is similar for the most part. In other words, the hall tables are not very radically different. 

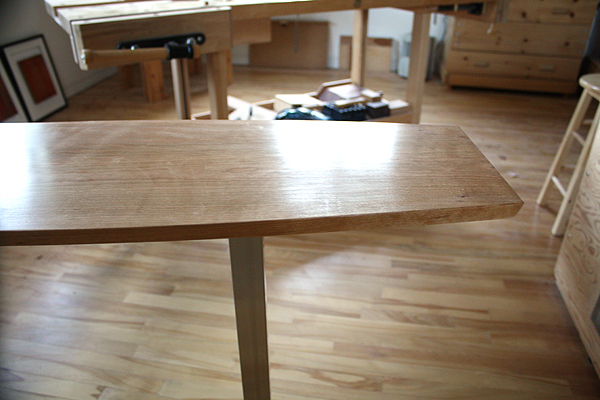
I'm combining both metal and wood in these designs which greatly appeals to me. I could easily substitute the metal components with wood if I so choose in subsequent versions of these tables. I thought to see how this combination works as I have had reasonable success combining wood and metal before. The woods I use are also quite different. In the first photo, the tabletop and leg components of the curved table are cherry whereas in the second table the table top and leg components are mahogany. You can also see the curved profile of the cherry tabletop above and the angular profile of the mahogany tabletop to the left. I also use some wenge for detail. I would say I am 75% complete at this point and should have everything complete in a matter of days. I also took the liberty to begin finishing the first of these hall tables, the cherry version. In the second photo I am scraping the bevelled edges of the mahogany table top. I will post photos of the completed hall tables in a few days.

Tuesday, June 12, 2012

French polishing...

I tend to use hand tools in my studio for the most part. Hand tools, when used effectively, impart a finish on woods which bring out the natural lustre of the surface. With this in mind, I should really carry this philosophy over to the finishing component of my work. I like to use hand-applied finishes for finishing. There are a few reasons for this and health and safety concerns are high up on the list. The main reason however is the clarity and depth that hand-applied finishes provide. My favourite film finish is shellac. You can't get a more natural film finish than shellac since it is derived from the lac bug and not man-made. Applying shellac however is altogether an art in itself. Shellac has been used as a finish for hundreds of years and only in the early 20th century was it replaced with modern day commercial type finishes. Modern spray finishes were developed to speed the finishing process.

The traditional method of applying shellac is to use the French Polish method. This involves laying down hundreds of micro thin coats of shellac using considerable elbow grease. The micro thin coats are gradually built up , then levelled and finally a process called polishing is used to acquire the mirror finish which French Polished finishes are known for. I've been quite intrigued by how this technique has remained the same over the centuries. It is a technique that was originally developed for musical instruments because the thinner, somewhat flexible finish aids in the accurate transmission of sound. Shellac finishes also bring out the depth and color of woods in a way that other film finishes do not. Other film finishes tend to obscure the underlying wood because they usually have a high amount of solids in them. The high amount of solids aids build up a finish quickly, something not necessary when hand applying shellac using the French Polish process. The French Polish process can take days to complete as it involves multiple sessions and the curing times in between so you need to have patience with this.

I don't use this process in all my work, but when I am using special woods in a piece I am creating; this clarity and deep finish is well justified. In the photo above, I am half-way through a French Polishing session and snapped this cool photo showing the already highly reflective properties of the finish.

Wednesday, May 16, 2012

Custom art...

As I discussed in my previous post, I was working on a couple of custom jewelry chests which have now been completed. I have posted a photo of one of the completed jewelry chests below. A while ago I had the opportunity to receive a challenging commission. This commission consisted of a fairly large wall art installation. The overall dimensions arrived at were approximately 8 ft wide and 32 inches high. The wall art was intended to be the focal point of a long wall in the living area of a home. The clients wanted something different and interesting, in a modern, contemporary style. Through a few exchanges of sketches and drawings with the clients, we arrived at a design the client was very happy with.

The initial step after the design process was to create a maquette or small scale model of the art. This is something I enjoy doing as it is fairly straightforward and provides a fairly accurate representation and 3-D view of the art. Otherwise, I am limited to perspective drawings which are great but limited in accurately representing the depth and relationship of components within the art. The initial maquette developed from initial sketches is above and we worked from this to refine the design. It can be seen that there are more tubular components in this maquette than in the next photo. The next photo represents the woods selected as well as some of the components necessary to attach the woods together to create the design. The clients were seeking a fairly unique piece of art for their wall and we decided on unusual woods for the larger components. This choice of wood was ash with intense spalting. The middle wood was bocote which served to contrast well with the very light, spalted ash top and bottom pieces. The dark bocote also brought the dark streaks in the spalted ash together in the art.

 The orientation of the pieces and the resulting offset layout form the basis for the modern, contemporary design. Offsetting the outside pieces allowed the components to span a greater width while forming the unique design. The design itself is kind of light and accentuates the negative space of the wall itself. The art is not smothering the wall but instead forms a series of light components joined together very minimally with tubular metal.


To the left is a photo of one of the completed jewelry chests I had the opportunity to work on very recently. The mahogany exterior has developed a beautiful colour quite naturally. I don't use stain and simply prepare and finish the mahogany. The mahogany colour will deepen slightly more over time further developing the classic reddish-brown colour often associated with mahogany. The cherry interior has also developed a nice tone. The contrasting wenge handles, through careful grain selection, become black with application of finish.

Friday, May 4, 2012

Smaller work...cont'd

I had the opportunity to snap more photos of the ongoing jewelry chest build. Test fitting is a large component in the process of creating these jewelry chests. There are numerous components that come together either in a mitered corner or a rabbeted corner. With this in mind, I make extensive use of shooting boards to trim these small components. The components consist mainly of drawer, compartment and tray dividers as well as the actual trays and drawers. Each of the pieces needs to be individually fitted after preliminary trimming. The interior of these chests is solid cherry and I make sure to use straight-grained rift sawn wood for the most part. I have been most successful with this cut of wood and find anything else tears and splinters easily. Since the tolerances are low in fitting these components... I like to have very clean cuts.

In the first photo I am test fitting the chest sides, front, back and top together. The sides have mitered and reinforced corners so absolute accuracy is a must. I also have the solid mahogany top inserted and trim this to allow for a consistent reveal between the chest and lid. Also, since the lid floats I pin it at the center allowing for equivalent movement. The band clamp I use is great for this purpose since it can be adjusted with one hand while I align the parts together. At this time the edges of the chest are square and will be next shaped and rounded over as part of the design. I have also designed and built chests similar to this with square edges and contrasting banding installed. So we can say this juncture is where this jewelry chest morphs into a rounded edge chest. Also important is to ensure that the chest remains square, that is opposing diagonals are exactly the same length. This is incredibly important since the interior component joinery accuracy hinges on the chest being absolutely square.

One of the next steps is to create and install the carved wenge handles. I have one handle for the lid and another for the lower drawer. Again, accuracy is kind of important in this step in that the handles need to be matched in shape and size as well as their position aligned along the front of the chest. Creating these wenge handles involves a considerable amount of hand shaping. I've been fairly successful with this jewelry chest design and I am glad to say it now spans three decades. I'll post a photo or two of the completed chests soon.

Tuesday, May 1, 2012

Smaller work...

I periodically receive requests for custom jewelry chests. These are designs I created a few years ago and have been fairly successful at making these over the years. Creating these jewelry chests allows me to work at a different, smaller scale. The jewelry chests are composed of many small parts which need to be assimilated together in a harmonious way. The small parts involve much fitting and I typically use a couple of shooting boards for this part. The shooting boards are set up on two different benches. One shooting board is set up for mitered work, the other for trimming ends of small parts.

Although these jewelry chests are small in comparison to full scale furniture, the time and effort involved in making these can often be greater due to the many different components involved. An analogy I like to use is that they are miniature pieces of furniture. I enjoy making these occasionally as it allows me to utilize different skills and techniques I don't often use for larger scale work. As an example, the fitting of the trays, and drawer. Although the parts are initially cut to size,there is detailed trimming necessary. The dimensions I use have been fairly standardized at this point but because many of the components are so small in scale, there is precision trimming to perform.

I'm currently working on a couple of these chests and they are at 75% completion in my opinion. I need to install carved wenge handles, line the inside of the lid and then begin the methodical finishing process. The complete process is an interesting one as everything takes shape within a few cubic inches. The best part of creating these is there is not very much wood involved and I can therefore focus on locating and purchasing high quality woods. These particular chests have a figured mahogany exterior , dark wenge handles and cherry interior.

In the first photo the raw mahogany can be seen with the deep, dark reddish brown colour it attains after prolonged exposure to light. This is the wood prior to preparation for the two jewelry chests. I have simply marked and cut pieces out for each of the chests as well as the solid mahogany tops. The photo directly above shows the two chests at 75% completion and the mahogany can be see to be much lighter. The colour darkens over time as does the colour of the cherry interior. I will post photos of the completed chests soon.

Tuesday, April 10, 2012

Different directions...

It has been a while since I last posted... due to different projects I have been involved with. These projects have ranged from installation work, a couple of custom jewelry chests, and some art work. The diversity of these projects keeps both my interest and motivation stirring. The common denominator with all this is of course...wood. I'm giving a presentation on myself and my work in the next few months and already it has caused me to reflect on how I began my journey of working with wood. Interesting how we never seem to think about the journey until we're asked to chronicle it. I also need to talk about the passion for wood I developed over the past decades and its origins. What seed was planted for me to begin this lifelong passion of working with wood. I think I'll slowly take notes whenever a good thought enters my mind about this, or an interesting event that occurred during the journey.

Aside from this I have been slowly developing my WoodSkills web site and adding content to it. I've always been a project oriented person and embrace the challenges that go along with some projects. WoodSkills is all about individual projects for me and I am enjoying developing the site and content.

For the longest time I learned to develop good methods of work, that is efficient, productive methods to gain the most and highest quality of work within the time periods I spend in my studio.

Today I spend an equivalent amount of time learning to understand how diversity of work keeps my excitement piqued. Routine, monotonous work.. although it is comfortable and is relatively stress-free, is not my calling. I probably speak for many artistic people as well as myself, need to have variety in the work and art we create. Often, simply alternating from one project to another is sufficient, or alternating between projects once they are completed.

I have also been experimenting with finishes and perfecting a modified French Polish type of finish. I take the best of the original concept and introduce modern methods to arrive at the same or similar result. The French Polish finish has been a challenge for me for the longest time. Much experimentation and a good dose of research have led me to develop a finishing technique I can successfully replicate each and every time. The best part is that it remains largely a hand-applied finish...maybe we can call it a neo-French Polish technique?