Showing posts with label woodworking class. Show all posts

Tuesday, November 12, 2019

Kumiko Demo

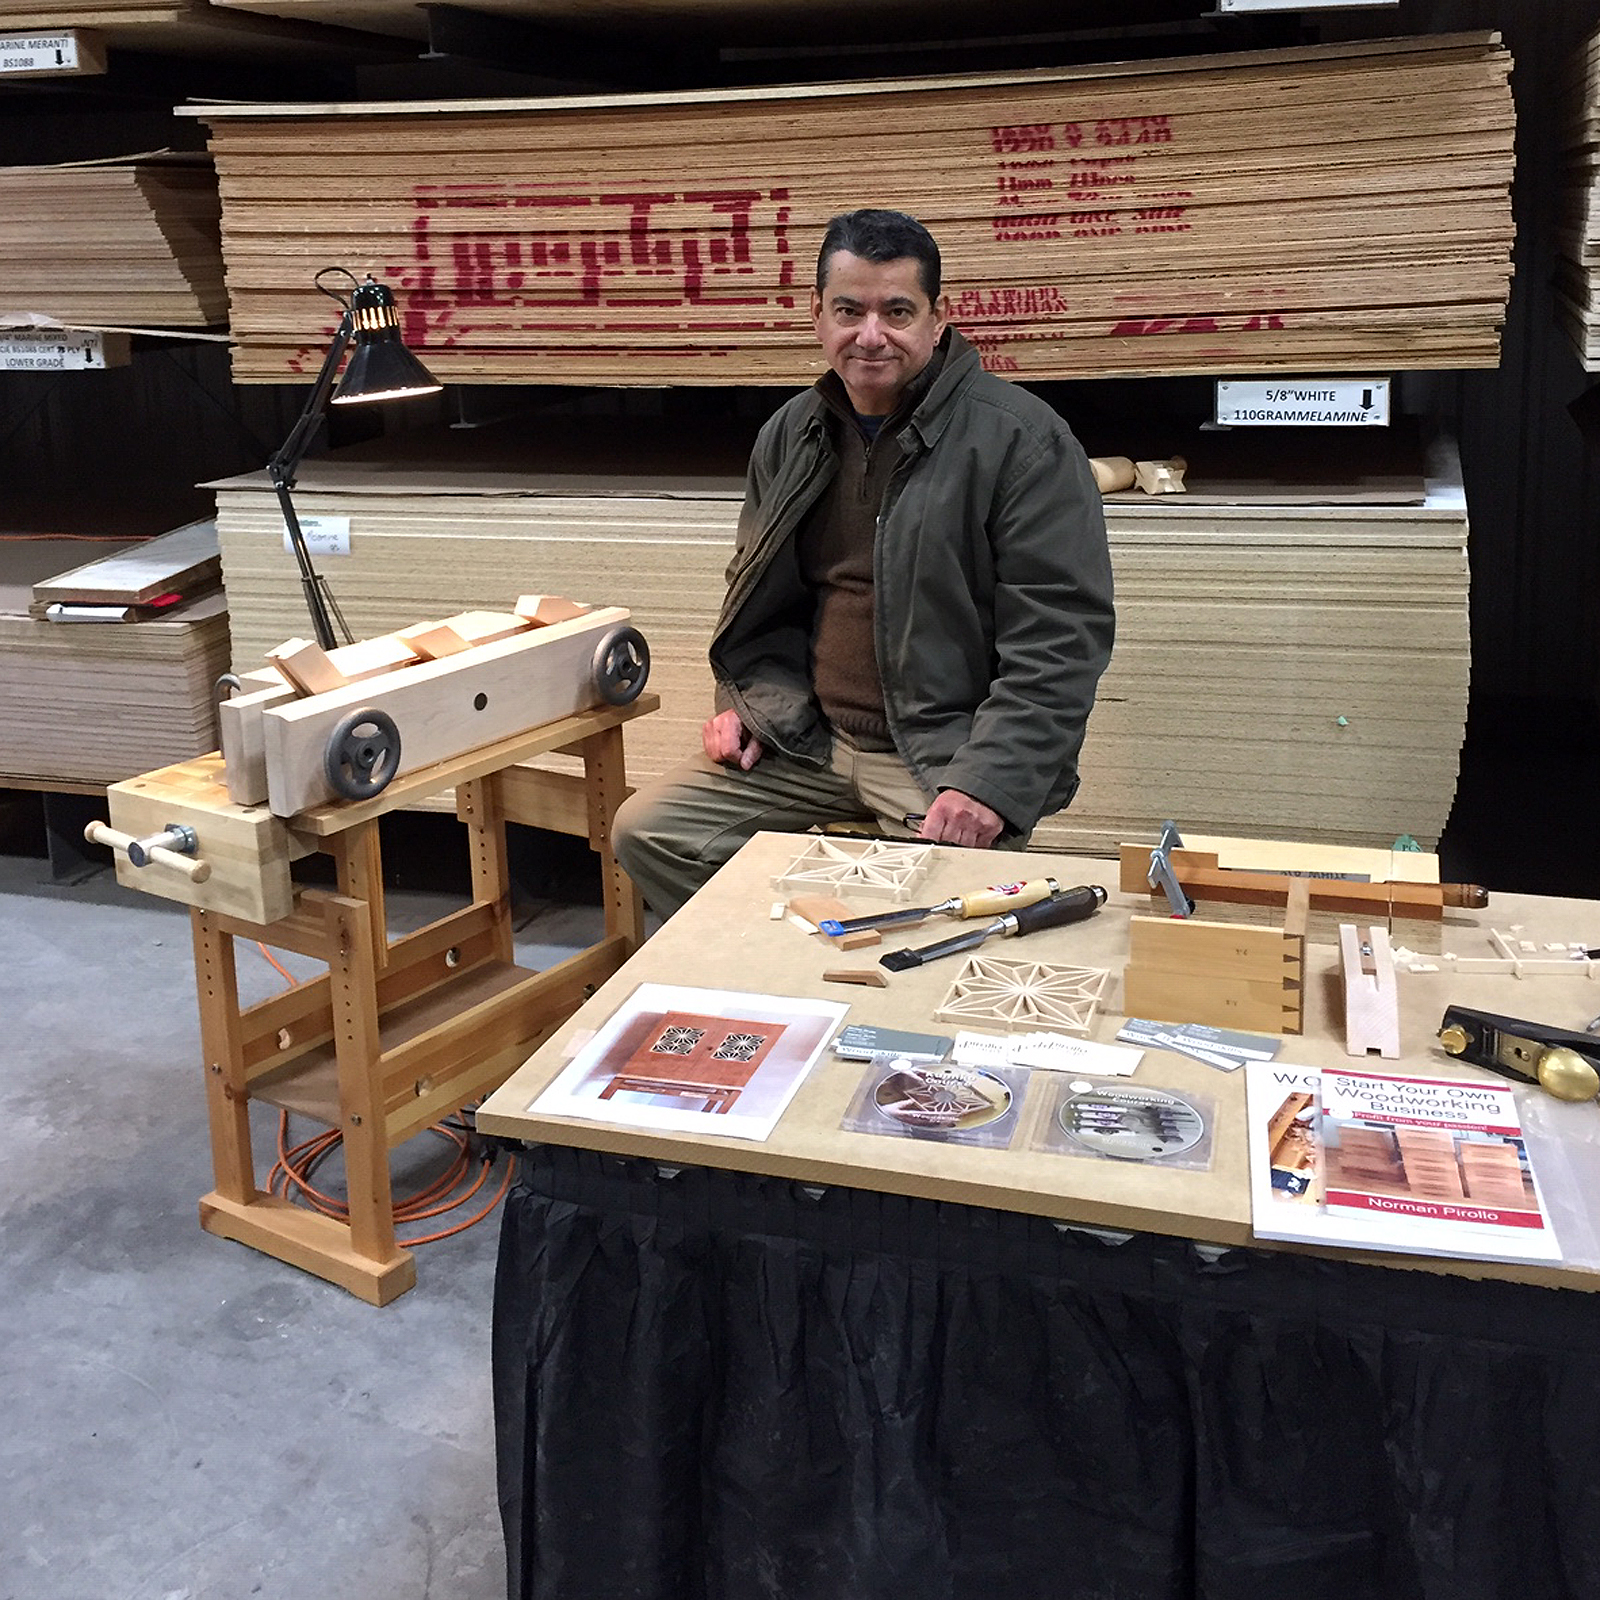
I came across an opportunity to both demonstrate and talk about the traditional Japanese craft of Kumiko at an annual woodworking event. In discussion with a local wood supplier and mill (Wood Source Ottawa, Ont.), they mentioned their upcoming annual open house and how they encouraged local vendors and artisans to participate. I quickly signed up at the opportunity to present and share my passion of Kumiko. Proceeds from the open house silent auction also went to a good cause, so this became another motivation for me to participate. I truly enjoy discussing woodworking and love to engage with people and hopefully motivate them to either start or continue to pursue woodworking.


I had several days to prepare and had sufficient time to create enough Kumiko components to last through the open house. The opportunity also challenged me to devise an innovative way to hold Kumiko guide blocks without having to continually unclamp and clamp the critical guide blocks to a vise. I was able to enlist my Moxon vise along with a small workbench to perform this. The opportunity also provided me the impetus to market a Kumiko Course I had been working on. I could offer the video-based course at the open house! So this all came together and I enjoyed two days at the open house engaging with people and introducing them to the centuries-old traditional Japanese craft of Kumiko.


At first glance, people would be in awe at the small scale of components in Kumiko. Their first reaction was how intimidating and difficult it was to tackle. After engaging and demonstrating the ease of forming and shaping the small interlocking parts, their fears vanished. Often, people need to have a technique presented in a live setting to grasp its intricacies. I get this and can easily relate to this form of learning and visualization. Techniques of safely using a wide chisel to pare wood were also demonstrated, being the core of Kumiko component creation.


I enjoyed the experience and in the process made a few local contacts. Hopefully, I have encouraged a few people to tackle Kumiko and woodworking in general. Working in a solitary studio environment often keeps me from interacting with like-minded people that share a common interest in woodworking. People enjoy sharing their passion and the timing of this open house was ideal since I was between projects and needed a break from my furniture design + making.

Link to  Kumiko Course

Friday, October 18, 2019

Kumiko Course

I have been immersing myself into the world of Kumiko over the past year. The intricate patterns or motifs draw you in where the possibilities are endless to the application of the panels in furniture. Another interesting fact is how Kumiko is a traditional Japanese form of craft. To be able to recreate the same motifs that were designed centuries ago intrigued me. At first I thought the delicate technique would be difficult to achieve since the scale of the components in Kumiko is quite small. Kumiko can be intimidating to a novice. Upon further research, I decided to further explore and experiment. As a woodworker, I enjoy challenges and this would be yet another in a long string of challenges over the years. How else do we grow as woodworkers if we don't embrace new skills and techniques.


So one thing led to another and after a few early failures and struggles, I was successful at mastering the Kumiko process of creating intricate lattice-like patterns within a grid or frame. The prerequisite to even beginning Kumiko is to create a couple of guide blocks. The blocks have preset bearing surfaces shaped at various angles. These angles are instrumental to the components within a Kumiko grid. Through the judicious application of a chisel to the miniature Kumiko components, precise angles that interlock the pieces are shaped or beveled. The process is methodical but enjoyable. Small or large grids of components can be created, where time and patience are the only variables.


There are several motifs or patterns to choose from, my focus was the asa-no-ha pattern or hemp leaf pattern. Although Kumiko patterns are considerable, nothing stops one from designing their own patterns. The challenge soon was overcome and the process became second nature to me. The next logical step was to integrate Kumiko into a display cabinet. This worked out surprisingly well!


Most recently, I packaged together several instructional video on how to make Kumiko. The videos show the detail involved and how to create the grids from rough blanks. Other videos focus on creating the small parts within the grid forming the intricate patterns. I also realized that creating the guide blocks is a prerequisite to Kumiko and this step kept many people from experimenting with Kumiko. So other videos describe how to create guide blocks in detail (from rough blanks). Guide Block plans are also included in the Kumiko Course.

Link: Kumiko Course  (WoodSkills)
Link: Kumiko Course  ( Refined Edge Design)

Kumiko Course


Friday, December 21, 2018

A Krenov revival...

Apologies for not posting more regularly but most of my project builds and images have moved to Instagram, @woodskillsmag and @pirollodesign. I've been working on my latest piece for a few weeks now. It is a cabinet on stand inspired by James Krenov work and philosophy. The story behind this particular piece is as follows. I originally created a similar piece to this in early 2012 and looked forward to making another a few months later.

Original cabinet on stand designed and created in 2012. Door and side panels are veneered with figured Big Leaf maple, interior is soft maple, back panels are Ambrosia maple, stand is cherry.

The design adheres to the principles of Krenov, construction follows his methods and philosophy, and the aesthetic is clean, minimalist and devoid of ornamentation. This has also become my furniture making style in the past 14 years or so. I discovered the work of James Krenov about 14 years ago and read his books quite regularly, each time extracting a new nuance or so. This was the age when learning from woodworking books was the preferred way of understanding woodworking. I followed Krenov's writing and tried to glean as much technical information from the grainy black and white photos in several of his books. A little while later, I attended a furniture making school that was founded on the principles of James Krenov and College of the Redwoods. It was one of a very few schools in North America espousing the tradition of hand work. This experience opened my eyes to a slower form of furniture making where the focus is on the wood itself and attention to detail is paramount. Where am I going with this? Well, between the years 2012 and 2018 I pursued a few other interests, mainly wood sculpture, furniture design, video production, writing books and publishing a semi-annual woodworking magazine WOODSKILLS. As well as returning to school to follow a one year business program, my woodworking continued.

My woodworking (2012-2018) followed a different path where I embraced modern, contemporary design. In this intervening period, I entered furniture design shows with very contemporary console table and chair designs. The years went by while I yearned to revisit that original cabinet on stand and hopefully make another. I had even developed a set of plans and drawings of the cabinet at the time thinking it would be a matter of a few weeks before I could start on another. Fast forward to late 2018 and I finally set aside time to fulfill this build. The following are progress shots. This version of the cabinet on stand has a slightly modified interior layout than the original. The stand is configured differently only because it was possible to do so and I wanted it to be both different and unique. A couple of new additions are a hidden, secret compartment, inlay on the front apron of the stand and the cabinet floats on the stand. Otherwise, the design follows the original piece created back in 2012.

Installing knife hinges in 2018 version of cabinet on stand

Fitting door panels an creating lip and rabbet where they join.

Interior layout of new cabinet mocked up on cabinet base (using a few of the tools I design + make).

Cabinet mocked up and drawer fronts fitted. Hidden compartment also visible below right-hand drawer compartment.

New set of three dovetailed drawers created (at bottom).

New dovetailed drawers fitted into respective drawer compartments.

The legs, aprons, rails for stand are mortised and prepared for loose tenon and dowel joinery (using modified horizontal mortiser).

Progress checklist (whiteboard and dry erase markers) on one of two wall-mounted hand tool cabinets.

Creating mortises for drawer and door pulls ( cocobolo heartwood and sapwood combination)

French Polish process for door panels and cabinet sides.

New version of cabinet completed. Note the dropped front apron with inlay and floating cabinet on side rails.

Cabinet with figured Big Leaf maple door and side panels and cocobolo pull. Cherry stand with inlay.

Interior of 2018 cabinet. Compartments are flipped from 2012 cabinet. Secret compartment behind the small blue cup at lower right.

The new cabinet on stand seen here. Final detail was the addition of a single, small bullet catch at top of right-hand door.

So I've fulfilled my requirement of building a Krenov-inspired piece of furniture every six years or so 👊😉

Tuesday, October 2, 2018

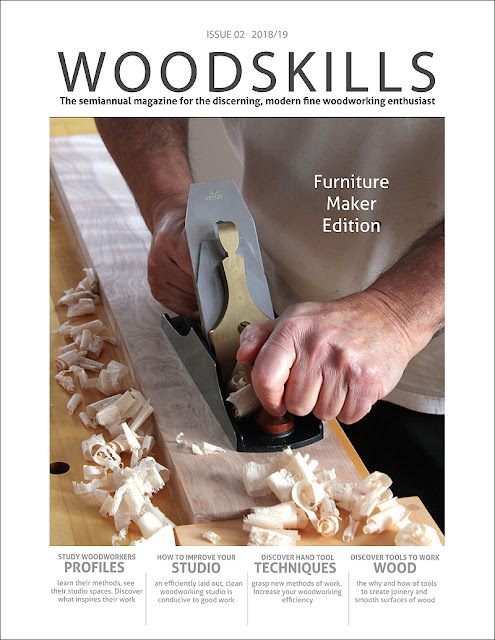
WOODSKILLS Issue 02 - now available!

The idea was hatched a year or so ago. A new magazine catering to the discerning, fine woodworking enthusiast. It was an idea that slowly developed and at one point became a reality. So a small team and I have been working at this and are happy to announce that the latest issue of WOODSKILLS woodworking and furniture making magazine is now available. Some of the features in this Furniture Maker Edition include furniture maker articles, profiles of accomplished furniture makers, best studio practices, contemporary furniture design, gallery, vacuum veneering, Moxon vise build, sharpening + woodworking strategies, wood selection strategies and social media for furniture makers. The terms studio and workshop are used interchangeably throughout the magazine. WOODSKILLS is a semi-annual publication, published twice yearly in late spring and fall.

As a follower and practitioner of James Krenov style of work and methodology, both hand tool and some machine techniques are included. Although the vast majority of articles refer to hand tools, machinery is not excluded. I find this to be a more realistic approach in this day and age. Machines can do the grunt work whereas hand tools are used to create joinery, shape and finesse furniture components, smoothing surfaces, etc. Advertising is at an absolute minimum and consists of curated advertising, a term gleaned from the art world. Advertising must reflect practices and products that our readers and the team at WOODSKILLS could use or include in their own workshops and studios. Available through woodskills.com (digital) or Amazon (print version) or Blurb (premium print version).
 
Furniture Designer + Maker Profiles
Darrell Peart, Craig Thibodeau, Jan Lennon, Brian Greene
Workshop Setups & Best Practices
Furniture Maker Articles
Vacuum Veneering
Furniture Design Gallery
Contemporary Furniture Design
Moxon Vise Build
Sharpening + Woodworking Strategies
Social Media for Furniture Makers

WOODSKILLS Issue 02 woodworking magazine

Instagram: woodskillsmag 
Twitter: WoodSkills
Facebook: WoodSkills 

Thursday, July 19, 2018

Pursue your passion...

As a few of you may know, my woodworking and furniture making career is the second one of my life. A long, first career in the hi-tech industry preceded my current career. It is difficult to view life through a rear-view mirror but I often think of how it would have been if the leap had been taken earlier on. When I began in hi-tech, technology was rapidly advancing and I could not absorb enough of it. My life revolved around computer technology and software. I worked for possibly the best multi-national computer firms and there was a mutual respect of what we brought to each other. Hi-tech today is quite likely the same where change is fast and furious. However, sometime in the middle of the hi-tech career I began to realize that grasping the latest technology was becoming a full-time job. It became increasingly difficult to keep up with the latest in hardware and software. I shrugged this off and continued on the journey, after all I did need a career and a pay cheque. My performance was above par but it became obvious I could not keep the façade going for several more years. The technology was just not as exciting to me anymore. I felt something was lacking in my life and began to seek a creative outlet instead.

A short time later I discovered woodworking through an evening class and was smitten. The creative aspect of woodworking and making tangible objects with the hands was the part lacking in my life. My focus began to turn to woodworking and the hi-tech career simply devolved into a series of jobs. One thing led to another, I launched a small part-time woodworking business over 20 years ago, it grew but not enough for me to leave hi-tech. The struggle of juggling employment with the part-time business eventually took its toll. I retreated and told myself the next step was to become a full-time woodworker. Life gets in the way however! A marriage, new home, a couple of downsizings later and I could finally live the dream of having my own furniture making business.


I often ask myself if I remained in the hi-tech industry for perhaps ten years too long. Looking back, I should have possibly exited hi-tech, struggled at woodworking and not look back. The hi-tech employment became a crutch and it was the pay cheque that kept me from leaving. It is difficult to say what the best path would have been. Circumstances were different in my case, it has all worked out in the end, but the "what if" lingers! Today, I see many younger woodworkers taking the leap into full-time woodworking and commend their courage. After all, why pursue a career you no longer have an interest in. This is one of life's biggest lessons and as mentioned earlier it is difficult to look back through a rear-view mirror. I recently read an article that summarized people's biggest regrets later in life. The regret of not having pursued their dream was high on the list. To summarize, pursue your passion!
So I teamed up with a videographer and created the following video in the form of a 5 minute synopsis of my exciting second career in woodworking and specifically furniture making!


Follow my journey on Instagram: @woodskillsmag
WoodSkills
Pirollo Design

Wednesday, January 3, 2018

Moxon vise build...(Pt. 1)

So I decided to build myself a Moxon vise over the holidays. Business slowed and I had the time to get going on this project. A Moxon vise was something on my mind for quite some time, it was simply a case of finding time to make it. Some time was spent on research to determine which version best suited my work methods. It is essentially a straightforward build, but critical to get it right to ensure the time and material investment is put to good use.

I'm not 100% sure of the origins of the Moxon vise design, but it is widely attributed to Joseph Moxon. Joseph Moxon (8 August 1627 – February 1691), hydrographer to Charles II English printer specialising in mathematical books and maps. Moxon's 17th century book. The Art of Joinery first described the double-screw vise. In this historical publication was documented the Moxon vise - a double-screw held to a workbench top with clamps or holdfasts in order to facilitate certain work.

The main criteria for me was to be able to hold work above the standard height of a workbench. Rather than piece together the hardware for the vise itself, I opted for the Benchcrafted Moxon Vise hardware kit as it includes everything mechanical. I would need to supply the wood and shape the vise jaws (chops). This would be for the basic vise. A more complex version with an additional work table behind the vise would involve several more steps. The overall length of the Moxon vise has yet to be decided on, but will be in the 28 to 32 in. range.


So after deliberating on the design, I simply went at it and worked on the front and rear jaws. Not having 8/4 stock available to me, I opted to laminate some 4/4 maple pieces instead. In the past, I have had success with the strength and stability of 4/4 boards laminated together. In selecting the boards, I mixed the grain orientations up so each of the laminated boards would counter the grain of the other board. This, in my opinion, balances out the internal stresses of the woods and keeps it all straight and stable. Laminating one of the jaws here with 4/4 boards. As they say, one never has enough clamps. In the pic below, this was almost the case, but it worked out. I do have other clamps, but for the most part, they are lighter. To be continued...


Thursday, November 2, 2017

The evolution...

Several years ago, 2006 to be exact, Michael Dresdner contacted me to ask about profiling me in an upcoming Woodworker's Journal online publication. Of course, I jumped at the opportunity to talk about my woodworking and how I got to where I was at the time. I was transitioning from primarily being a box maker to furniture making and the reasons for this shift in direction were discussed in the interview.


Jewelry Box Build

In that period, I had completed a series of courses at a high-end furniture making school and began to use hand tools more in my work. I recall that the year 2006 was an important juncture in my woodworking. I had embraced the Krenov philosophy and his methods of work. Reading and attending the fine furniture making school inspired me to increase the complexity and scale of my woodworking. I also learned to slow down my woodworking and focus instead on each and every piece rather than applying myself to creating in batch mode ( multiples). So my direction changed dramatically in the years 2006-2008 to where I now design + build one-off furniture pieces exclusively.

The most important takeaway from the interview would likely be the last line: “If you are tired of your day job,” Pirollo advises, “do what I did. Pursue your passion instead.” To this day, I completely believe in this quote. It is never to early to pursue your passion. Get a head start, so if unforeseen circumstances affect your livelihood (career), you will be prepared.  Early on my hi-tech career, I pursued many woodworking courses at the college level, set up my own workshops and struggled and worked at learning the woodworking trade. After experiencing a total of 3 downsizings, I gave up on my hi-tech career and moved on to a career in woodworking. This had been my Plan B all along 😉 The important part is that I was well prepared to launch a second career. You never know where fate will lead you!

I'll let you read the article.
Norman Pirollo: The Refined Edge of White Mountain


Saturday, October 14, 2017

Cabinet Build Class

I have recently compiled a series of 16 videos into an online class. The subject was a recent display cabinet build. The design and build of the striking Krenov-inspired display cabinet seen below is discussed and demonstrated. The contemporary styled display cabinet features veneered sides and doors. The veneers selected are highly figured although they can be substituted with alternative veneers. The frame and panel back adheres to the Krenov principle of properly finishing the back of the cabinet. James Krenov is widely known for his classic cabinets on stand as well as the incredible attention to detail he brought to furniture making. He also brought a unique philosophy and vision to furniture making of which I heed and practice. A large part of this veneered display cabinet has been created using an assortment of hand tools although some machinery is used in the initial wood preparation stage. Follow me as I describe the steps involved in creating a masterpiece veneered cabinet on stand.


The following topics are covered in detail in this 16 part design and build class:
  1. Inspiration and design of the display cabinet
  2. An overview discussing components of the cabinet
  3. Wood selection and resawing veneers used in cabinet
  4. The advantages of using veneers over solid wood
  5. Detailed information on creating and using resawn veneers
  6. The process of applying veneers to the sides and doors
  7. Implementing bake-ins to create panels with hardwood edges
  8. Hardwood edging and the veneer press
  9. The veneer press and joinery used in the cabinet
  10. Card scrapers and the use of a shop-made drilling guide
  11. Dowel drilling guide in-depth
  12. The case construction process
  13. Frame and panel construction of the back panel
  14. Back panel detail and installation
  15. Final case assembly of the display cabinet
  16. Installation process of knife hinges for the doors
Each video segment addresses one aspect of the cabinet build. The design process as well as the methodology behind the build are addresses. This is not simply a class on how to build a cabinet on stand. The class will inform you of a similar design process that James Krenov used in his own work. Since I am an ardent follower of James Krenov, the practices I use in this cabinet build closely follow those of James Krenov. Discussions and demonstrations describe how the design of this display cabinet originated and the design considerations in its build. Information on wood selection and preparation as well as the joinery used in this cabinet is covered in detail. Tips and techniques acquired over several years of creating this style of cabinet are shared in this class. The process of creating and applying veneers is covered as well as information on the installation of knife hinges. More info in the Tutorials section of my web site.


Wednesday, October 11, 2017

Furniture Design Course

In this new course, I cover the furniture design topic. This is a topic near and dear to me as I believe that good design is essential in a quality furniture piece. Good design also minimizes wasted resources and provides a furniture maker with essential feedback and pause when creating furniture. Loosely translated, the design process keeps the maker from rushing into a potentially flawed furniture design. The checks and balances give pause to the process as well as streamlining the build. Developing your own style and furniture aesthetic is also covered. Selecting the right woods for your furniture design is critical in determining the appeal of the final furniture piece.

As with most woodworkers, I was anxious to build furniture early on. With the passage of time and several furniture projects completed, the anxiety of simply creating work had passed. It was far more important to create a well-designed and striking piece of furniture. So I delved into furniture design, studied with some renown furniture makers, and used this knowledge to establish a furniture design process that works.


Furniture Design Course

In the online furniture design course you will learn the skills necessary to design and create your own unique furniture. Learn to develop your own style of furniture and aesthetic. Over 2 hours in total. Course features videos on these topics:
  1. Furniture design overview, the history of furniture design
  2. Becoming familiar with the furniture design process
  3. Understand design process, bring your furniture designs to next level
  4. How to select wood for a furniture design
  5. Use of mockups and prototypes to develop a furniture design
  6. In-depth use of mockups to develop a furniture design
  7. Determining a furniture style for your own furniture designs
  8. Selecting a furniture style and aesthetic
  9. Developing a furniture design
  10. Getting the proportions right in a furniture design
  11. Using the dynamic design process in a furniture design
  12. Use of maquettes and prototypes in a furniture design
  13. Use of templates and CAD when designing your furniture

Sunday, July 23, 2017

Furniture maker's mark

The concept of a maker’s mark is not a new one. It has been around for centuries. It is a means to distinguish one’s work from another maker. It also adds a personal touch to every piece created by a maker. I have incorporated maker’s marks in my own work for the past two decades and have had excellent feedback from clients. Clients love the fact that the furniture piece they purchase is created by an individual. It adds to the cachet of the piece and serves to provide identification of the origin of the piece. Decades from now, the maker’s mark instantly identifies the furniture piece as created by a particular maker with the location of its creation. The new maker’s mark designed for my studio captures the essence of my work and the detail I like to instill in my work.


So I also use the new maker’s mark for my other work, namely woodworking tools. I find a place on each tool to inlay the maker’s mark. In a strange way, adding a maker’s mark inspires me to do my best work. Attaching my name to a furniture piece or handmade tool makes me more conscious of how the tool or furniture will likely be passed on from generation to generation.


Furniture maker’s marks also provide a historical point of reference to a piece of furniture or tool. The maker and country of origin can then be traced back to a particular maker. Maker’s marks can either be stamped on a furniture piece or hand tool or created as brass inlay similar to this new one applied to my work.


I hope everyone is enjoying the summer. It is my favourite time of year. I can shed the layers of clothing worn in other seasons and simply walk out the door. No complaints here about heat or humidity. The hot, humid part only really lasts a few weeks or months and the freezing cold alternative is always fresh on my mind 🙂  More tools at:  www.refinededge.com 

Wednesday, June 28, 2017

Miter saw stand...

A while ago, I realized that my workflow would be more efficient if I had the means to cut long planks into manageable pieces. Longer planks ensure that wood graphics are consistent in the woods used in a particular furniture piece. The pieces would be, in turn, processed on a jointer and thickness planer. In the case of highly figured tearout-prone woods, I would use a series of hand planes to achieve the desired board thickness.

Until this time, I would crosscut large planks using a hand-held circular saw. If any precision was necessary at all, the circular saw left something to be desired. So enter the miter saw. I purchased a sliding miter saw and designed and built a stand for it. The criteria for the stand were that it be portable so I could move it around the shop if necessary. It was also important that it be designed to be folded up after use and placed along a wall. The intention was to have the miter saw available occasionally for cutting large planks down to size. I only ever work with one or two planks for a particular piece of furniture, so the miter saw could be put away between use. A few of the wide boards I use in my furniture can be seen against the wall at the left.


I designed and built this miter stand for my particular miter saw, a Dewalt 10 in. model. The miter saw itself can easily be detached from the stand and the table surface folded onto the metal sawhorses below. Since this would be a custom build, I could make the miter stand as long as I like. I decided on a length of over 7 feet. The left and right tables each have a fence system aligned with the miter saw fence. The largest width of planks I could process is approximately 10 inches. This is as wide as most, if not all of the planks I ever use in my work. Anything wider I can either rip an edge off or find alternative means to cross-cut it.


Each fence has its own track system with both shop-made wood stops and retail metal stops. I uses the torsion box principle to build the left and right tables. Even with the utmost design in mind, it was necessary to make changes. When wide miter cuts were necessary on large wood pieces, it would be convenient to use the miter saw. This hold more true if the cuts are repeatable as when working with multiples. Swinging the saw completely to the left or right was an issue. Hence the re-designed mitered corners in both the left and right tables. I can set the saw to extreme miter angles now, greater than I would normally use in my work. So after replacing the corner of either table with hardwood cherry blocks and trimming, the mitered corners can be seen below.


I have been using this miter saw and stand setup for a long while now. I never did fold and put it away. It is so convenient that I prefer it to remain set up. Soon after using it for the first few times, I realized dust control would be necessary. A dust port adapter was set up to connect the sawdust exhaust port to a dedicated shop vacuum. Still debating whether I need to make a dust shroud for it, but it works well as is and I like that it isn't hidden in a shroud. Overall, a fun, exciting build and at times challenging!

Monday, May 29, 2017

Horizontal slot mortiser (update)...

So I just created a 2-part video of the Jessem Mortise Mill mounted on my rolling cart. The two-part video for this can be seen at: https://www.youtube.com/WoodskillsCourses . Tech in wood joinery meets handcrafted design + build. Top is the mortising unit mounted horizontally, below the micro-adjust system. The original story follows as this is an update to an earlier post. The Jessem Mortise Mill unit was purchased a few years back and I created a few loose tenon slots successfully with it. The original mortiser design was to mount it vertically and use a power drill from the top down. Although this worked, I found the drill pressure would push the board down no matter how much clamping pressure I used. So I put the Mortise Mill aside for a few years until recently. During a shop reorg, I found the unit gathering dust and decided to re-incorporate it in my shop. I had always wanted a horizontal slot mortise and thought why not set this up to create slots horizontally instead of vertically. Original instructions were to install it vertically with boards placement underneath. So I decided  instead to mount it so slots were created horizontally as a horizontal slot mortiser. 

Next step was to find a suitable platform, i.e. workbench surface to mount it. A rolling cart in my workshop was ideal since I could wheel the unit away when not in use and the footprint of the Mortise Mill was not large. The rolling cart has large locking casters which do a good job of keeping the cart immobile. Installed it so the surface of the base plate was even with the surface of the cart, this took some time. I used large enough 1/4-20 bolts to maintain rigidity and keep it from shifting. The Jessem mortise Mill requires that a shop-vac be attached to the dust port otherwise the unit begins to clog up with sawdust, this can also be seen in the videos.

Have been using it since and am pleased with the system. The addition of the L-shaped wood bracket to support stiles while being mortised works well. The ends of rails to be mortised are easily supported by the wood surface of the rolling cart. I like the fact that I can permanently leave the Mortise Mill bolted to the rolling cart.

The only small issue was the vertical adjustment of the slots on a board. Since the Mortise Mill was installed horizontally, the adjustment was not as smooth as I would like due to the weight of the sliding carriage of the unit. Notice the etchings on the Mill are upside down. So, using scrap walnut and maple, in comes the micro-adjust setup to solve the problem. It is all wood construction with a 1/2 inch lead screw and wood handle. The end of the lead screw has a custom cradle contoured to fit the bottom edge of the sliding part of the Mortise Mill. I can precisely dial-in slot placements for either offset or different thickness boards now! 


Since the micro-adjust system is cantilevered off the rolling cart, I beefed up the supports, it's probably over-engineered now. Things to watch are the exact placement of the tip of the lead screw over the center of the edge of the Mortise Mill for smooth operation. A large paddle switch for the built-in Mortise Mill dust collection was installed for convenient access.


The two-part video for this can be seen at: https://www.youtube.com/WoodskillsCourses
Completed, tested and have been using for a few months now. Works great!

Monday, May 1, 2017

Cabinet build...

I’ve been working on the components for a standalone cabinet lately. As well, working on the design of a second smaller cabinet with a unique focal point, to be discussed later. The cabinet on stand below features one of my favorite figured woods, domestic ambrosia maple. I have a small stash of this wood in planks so the decision was made to resaw the wide planks and create veneers. Veneers maximize the yield from the planks. The cabinet will have veneered front doors and side panels. The remainder of the cabinet, the top and bottom panels and back panel consist of conventional maple. Ambrosia maple, when finish is applied, exhibits a beautiful, warm color while accentuating the wild graphics it is renown for. The graphics are what draw me to ambrosia maple. Also, it is a member of the soft maple family, so not difficult to work with and to smooth the surfaces. One of the attached pics is an earlier cabinet I completed using ambrosia maple throughout.


I have yet to decide on the finish of the current cabinet build, definitely something that will highlight the wood graphics.The other pics are the almost completed panels I will be using in the build. The veneered panels are not exciting at this time, but application of a penetrating clear finish will pop the graphics, colors and grain. The frame and panel back is a work in progress at this time. The interior compartments will also be different but consist of dovetailed drawers in an unusual arrangement.


The dimensions in the current version will be close to that of the earlier version since the proportions appealed to me. I have not yet designed or created the components for the stand, so this might be different than the earlier version. What I typically do is build the cabinet, then begin work on the platform or stand. The process is not as overwhelming to me using this approach, as I prefer to work on a project in stages. The satisfaction of seeing tangible progress in the project motivates and excites me to continue :)   More details to follow on the individual components and joinery used.

Tuesday, June 28, 2016

New web site...

After 9 years of blogging here, I have a new place for blogging. Along with a new web site.. WoodSkills , a new blog is now integrated into this new site.  The new site and blog will allow my readers to view my blog directly at the web site. I've had to replace the existing WoodSkills web site with a new, up to date one mostly due to new web site conventions and standards. I also decided to continue blogging here at The Refined Edge for the next while.

With the advent of mobile phones and tablets, it became critical to have a web site which rendered well on the different devices. The Internet was the wild west many years ago, web sites would render well on one browser and fail miserably on others. Today, technology has evolved to where modern web sites need to render not only on the desktop but also on mobile devices and tablets.

Other news. I have had to undergo some major surgery recently and am currently on the mend. The post-surgery recovery period limits what I can do, so not much in the way of physical activity for a few weeks. I am planning to get back into the shop later this summer, (mid-August). At this time, activities such as hand-planing are restricted as well as lifting objects. So this effectively rules out woodworking for a few weeks :( This is me on the day of discharge from the hospital. I'm up and about now and improving every day.


Please visit the new WoodSkills site for new blog posts and other information, offerings.

Saturday, March 26, 2016

New, updated woodworking course...


What I've been up to. So I decided to update the Woodworking Course I have been marketing. I hunkered down and added new graphics and images to the course. It is now much more interesting to watch and hopefully a great learning experience for someone wanting to learn woodworking. The comprehensive course content is similar to what it was, the lectures are all there although a couple of lengthier lectures ( bandsaw and veneering) have been broken up into 2 individual lectures each. In the process there is a new Course Overview that I will include here. This was a huge amount of work and I broke it up into manageable pieces over a period of weeks. I enjoyed the process and it re-acquainted me with some aspects of woodworking I had been neglecting! Available through: WoodSkills