 I mentioned in the previous post how careful to be when mortising the hinge recesses with hand tools. A good approach is to use a sharp marking knife and sharp chisels of different sizes. I make sure to mark the outline of the straight knife hinge carefully using the marking knife, this creates a tiny notched line which allows me to set the tip of my chisels into. Accuracy is greatly increased using this technique over using a pencil line. The mortise recess itself is created in stages, being careful not to remove too much wood in each pass. Once a substantial depth of the recess has been created, I find the mortising goes along much quicker as there is less opportunity for the chisel blade to skate across the edge of the board. The chisel is tapped in lightly into the marked line, creating sufficient depth to remove each layer of wood from the mortise recess.Initially, I had placed the door on the already mounted hinge leaves in the carcase, confirmed my measurements and simultaneously made a secondary mark or notch of where to orient the door hinge on the edge of the door. After creating the initial depth of the hinge mortise, I test fit the door to the already installed hinges on the carcase by sliding it in and confirming my markings are correct. You can see I spend a considerable amount of time confirming all measurements and markings are correct since it is not a simple task to correct any of this afterwards as the hinge mortises are already created. This is probably a good place to have practised these steps on some spare boards to get it right.
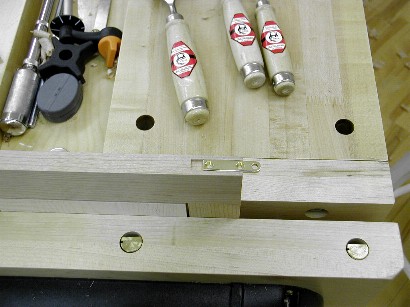
In the photo above, the knife hinge leaf is inserted into the mortise. The depth of the mortise should be equal to the thickness of the knife hinge leaf, in this case 1/8 inch. I'll continue on with these steps and install and adjust the doors so they are both plumb, level and spaced evenly to both each other and the carcase itself.It looks like we've been hit with an early winter up here, typically there is little snow on the ground before Christmas. I've taken up downhill skiing again after many years and I'm kind of glad to see the snow, planning the first ski trip already.
 I've spent a little time ensuring the front doors were square and true to the carcase, this involved some judicious hand planing along the outside edges of the door frames where I had purposely left a fraction of an inch of extra wood. I'm preparing myself for the next step in the build sequence which is installation of the knife hinges. I typically use knife hinges in a cabinet such as this. Knife hinges are strong, fairly hidden, elegant looking, and traditionally used in smaller cabinets such as this jewelry armoire.The knife hinges come in pairs , one pair per door. Knife hinges are available in two formats. In this project, I've chosen to use straight knife hinges since the doors overlap the carcase. An L-type or offset knife hinge would have been used had the doors been rabbeted or recessed into the carcase edges instead. The straight knife hinge is by far the easiest of the three to install. The installation consists of mortising hinge recesses in the base and top of the armoire, one per hinge. A complementary recess is mortised into the top or bottom corner of the door frame, again one per hinge. Accuracy is key with knife hinge installs. In the photo above you notice a small spacer behind the knife hinge. This spacer has been measured from the edge of the carcase to the leading edge of the hinge on the door itself. A good reason for using this spacer is that I want to leave a consistent reveal between the rear edge of the door and the carcase edge. In my case, I've decided to leave less than 1/32 inch. This 1/32 inch is combined with the thickness of the remaining wood after hinge is centered on the door. The spacer makes it easy to mark where the hinge should be installed. The other mark for the hinge is the width of the knife hinge itself, or 3/8 inch in this case. The same spacer is used on each of the corners of the carcase.Hinge installs on the tops and bottoms of the door frames are fairly straightforward. The center of the door frame is used as a reference and the hinge mortise is equal on either side, in this case approximately 3/16 inch. As a precaution, I fit the doors back into the carcase and confirm the outline of the door part of the hinge using the base or top hinge for a reference. Another important consideration is to create each mortise in a straight line and parallel to the carcase or door frames. The depth of the mortise is the thickness of the knife hinge leaf. The hinge pin straddles the corner, however this can be adjusted later in the fitting of the doors by sliding the hinge in or out a fraction of an inch..I mortise the hinge recesses using a set of bench chisels, and much prefer this method. This method also allows me to install the knife hinges after the carcase is assembled which results in a more accurate installation. If there was a time you ever needed to exercise patience in woodworking, this would definitely be it. Carving out the mortises is a somewhat slow , tedious process, but as you can see the results are very satisfying. You will need very sharp chisels if you use this process. I've completed four base and top hinge installs, next are the door frame mortises and hinge installs. Afterwards, I install the doors and adjust.I'm anxiously awaiting the final installation of the doors, afterwards I can move on to working on the interior of the armoire. The interior drawer section involves more detailed work.
 I alluded to the term "dynamic design" in a previous post. This is a term I have coined to describe how design doesn't necessarily need to be cast in stone but instead can be modified as a project progresses. The changes I refer to are often subtle changes and not large scale changes. One of the meanings for the word "dynamic" from the American Heritage Dictionary.dy·nam·ic - Characterized by continuous change, activity, or progress As a piece of furniture is being handcrafted, sometimes the design we originally envisioned can be improved on at different stages, or the original design can remain as is. Having this flexibility provides a continuous excitement for the furniture maker along with the benefit of improvising on the original design after seeing the furniture piece at various intermediary stages.An excellent example is the original design of the door frames. I had chosen to form the vertical stiles a little thinner than the horizontal rails to accentuate the horizontal lines running across the door frames into one continuous shadow line.The other design element was the angled horizontal rails. After mocking up the door frames with panels inserted I found these to be a unnecessary details as the focal point of the doors is fundamentally the figured door panels. Often, too many design elements take away from the focus of a piece ... I believe in leaving as few detail elements as possible to have the major element stand out. I have left the door frame members instead at the same thickness, this only really made sense to me after having dry fitted the door frames and panels and applied to the armoire as the photo in an earlier post. So here we have an instance of what I like to call "dynamic design", sometimes the beauty of a design is in its simplicity. Simplicity is one of the tenets of the minimalism philosophy. I have to admit that I am a fan of "minimalism", and have read one book on the subject so far. You tend to gain a different perspective on design after being exposed to the minimalism philosophy.

 I mentioned in the previous post how careful to be when mortising the hinge recesses with hand tools. A good approach is to use a sharp marking knife and sharp chisels of different sizes. I make sure to mark the outline of the straight knife hinge carefully using the marking knife, this creates a tiny notched line which allows me to set the tip of my chisels into. Accuracy is greatly increased using this technique over using a pencil line. The mortise recess itself is created in stages, being careful not to remove too much wood in each pass. Once a substantial depth of the recess has been created, I find the mortising goes along much quicker as there is less opportunity for the chisel blade to skate across the edge of the board. The chisel is tapped in lightly into the marked line, creating sufficient depth to remove each layer of wood from the mortise recess.
