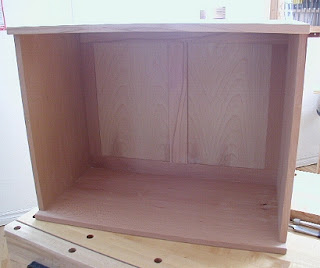
 The back frame and panel is assembled with panels in place and installed at the back of the cabinet. The cabinet is slowly evolving into a piece of furniture. The frame and panel back fit very snugly after some light, judicious planing of the outside rails and stiles. I have not yet finalized the layout of the interior of the cabinet, but I expect to create an assembly with two or three drawers in the lower right section of the cabinet. In the photo, you can see the overhang at the front top and bottom of the cabinet to allow for the front doors. The amount of overhang or space I allowed for is the thickness of the individual veneered door panels along with a very small extra gap both behind and ahead of the door.There is also the small chamfered edge of the top and bottom surrounding the cabinet front, sides and back. Creating the door panels is my next task in this cabinet build and I will be working on this over the next days. I'm also working on the stand design which has not yet been finalized. I have a feeling I will be modifying the original drawings and doing something a little different here. I'm just waiting to determine how the enclosed cabinet looks to me and what stand design provides the best complement for the cabinet. This goes back to a term I coined a few months ago on an earlier project.
The term I coined is "dynamic design" and allows the maker to dynamically modify a design as the build progresses. The modifications in design are directly attributable to how the project is taking shape, as opposed to moving forward with an existing design which might or might not make sense any longer. The concept of dynamic design and artistic freedom go hand in hand. I mention to my clients that the design will most likely evolve as the project continues and to expect some changes, most likely small ones. There needs to be a certain trust between the maker and client to be able to accomplish this, something I strive to provide the client.
I should have the beginnings of the door panels done in the next day or so along with resawing of the veneers I will be using.
 I've been working on the frame and panel for the back of the cabinet. This frame is composed of the same wood, European beech, as the cabinet. The components of the frame and panel back are two outside stiles, a center stile, and the upper and lower rails which are continuous along their length. The width of the individual components is approximately 2 inches or thereabouts, and I based this on aesthetics along with availability of clear quarter-sawn beech stock on hand. The type of joinery I have selected for this back is the mortise and tenon. The stiles are of equal length, so are the the respective tenons at either end of each stile, which also fit into the grooves in either horizontal rail. In the photo, the frame is temporarily installed in the cabinet back recess for a test fit. I am in the process of creating the panels to fit into each of the frame halves.Some judicious planing is involved in creating a perfect fit of the frame and panel into the back of the cabinet, but I had already allowed for this with a very small fraction of an inch in extra width of the frame. Another factor in the decision for the stile and rail widths is the factoring in of any small wood movement of the rails and stiles in their widths. The wood I have selected is fairly quarter-sawn so movement is substantially reduced and the fairly narrow widths of the components reduces the remaining movement considerably. The panels will be floating with a small gap around each edge to allow for wood movement. Once I have this frame and panel back installed, the cabinet will have developed an entirely new look, that of a cabinet without front doors.
 I use dowels to join the panels together, the sides together, the sides to the top and bottom. The main reason for this type of joinery in this particular application is that it allows me to have a slight overhang of the top and bottom panels vis a vis the sides, to accommodate the chamfered edges.. Alternative methods of joinery that allow this are mortise and tenon, sliding dovetails. etc. I use dowels as I feel comfortable with this joinery and it has not let me down so far. A considerable amount of accuracy is necessary in aligning the dowel holes that mate with the top, bottom and side panels. There are also different methods to accomplish this. The simplest method is to use dowel centers, next would be a doweling jig of some sort.Instead, I make a doweling guide which is simply a block of wood with the exact dimensions , thickness and length of each of the side panels. The concept is to use the guide to create mating dowel holes in the ends of the panels. I use standard size fluted dowels and have pre-measured and carefully oriented each of the side panels to its corresponding top and bottom panel. In the photo, I am aligning the doweling guide on one of the side panels. I since removed and bored two other holes in this particular guide for a total of ten dowel holes. Also in the photo, the face of the side panel is displayed, the back of this panel has a rabbet running lengthwise at the left hand side. The first dowel hole from the left is offset to accommodate this.
As I continue with this boring process ( no pun intended) there are eventually a total of 80 holes bored into the ends of each of the panels. A stop is used to bore to the correct depth to accommodate standard size dowels. Afterwards, each of the bored holes is checked with the depth gauge of a caliper and install the dowels, first on the side panels, then these panels to the top and bottom panels. Some test fitting, and the glue up begins...
 My next logical step in the progression is to create the rabbets for the frame and panel back. The rabbets in the left and right side panels are fairly straightforward. I selected a 5/8 inch depth and 5/16 inch width for the rabbet. The 5/8 inch thick frame provides sufficient strength for the 5/16 inch back panels. The will be two back panels housed in the frame which is divided by a center stile, or at least this is what the plan is. It is fairly important to have the depth of the rabbet uniform in both side panels and the top and bottom panels, this involves careful measuring and allowance for the chamfer edge profile of the top and bottom panels.
The rabbet in the top and bottom panels is a stopped rabbet, ending just before either end of the back of each of the top and bottom panels. After removing most of the wood to create the rabbet, I squared the ends of the rabbet using chisels and careful marking. To ensure all the panels are squared up and exactly the same size I overlay the top panel onto bottom panel without the side panels and then with the side panels in place.
In the photo, the panels are loosely assembled to confirm all the rabbets are the same depth and uniform around the carcase. I also take this opportunity to mark the outline of each of the side panels onto the top and bottom panels. This paves the way for the next step which is to create the joinery for the panels, in this case dowels. I create a doweling guide which is the same dimension, thickness and width as one of the ends of the side panels.
More about this in the next post..
 I left off preparing the four panels which comprise the carcase of the cabinet. Since then, I've spent more time on the four panels and in particular the top and bottom panels. After some final smoothing and scraping of the faces I began preparing the edges. I hand plane the edges at the ends of each of these panels with a block plane set to a light cut. This leaves a nice, smooth edge at the ends as opposed to a slightly fuzzy edge before hand planing. Once I have this edge planing complete, the top and bottom panels are checked to confirm that they are the exact width and length and perfectly square to each other. The profile I have decided on for the edges of the top and bottom panels is an approx. 3/32 inch wide 45 degree chamfer which I accomplish with a block plane as shown in the photo. Beginning with the edges at the end and finishing with the long edges, I create these very small chamfers. Some judicious, careful hand planing is necessary here to maintain the correct chamfer width along the length of the end and long edges of each panel, both top and bottom. It's actually easier than I describe once a rhythm is established. I find the 45 degree angle is easy to visualize and set as opposed to any other angle between 0 and 90 degrees. The profiled edges are important to create at this stage since the next steps involve attaching the side panels to the top and bottom panels. It will be virtually impossible to create the profiles afterwards.
Next, I will complete preparing the side panels, confirm they are square to each other and identical in length and width and begin to mark their orientation to the top and bottom panels. The side panels will be set back approx. 3/4 inch from the front edge of the cabinet to allow for the doors. The doors are veneered panels with a finished thickness of just under 3/4 inches. The side panels are to be attached to the top and bottom panels with a series of dowels and the creation of the doweling template jig specific to this cabinet is also next in the sequence of steps to be performed.
Another of the next steps is to create a rabbet for the back panel. This back panel, a frame and panel and yet to be created, will be housed into both the top, bottom, and side panels.

 The back frame and panel is assembled with panels in place and installed at the back of the cabinet. The cabinet is slowly evolving into a piece of furniture. The frame and panel back fit very snugly after some light, judicious planing of the outside rails and stiles. I have not yet finalized the layout of the interior of the cabinet, but I expect to create an assembly with two or three drawers in the lower right section of the cabinet. In the photo, you can see the overhang at the front top and bottom of the cabinet to allow for the front doors. The amount of overhang or space I allowed for is the thickness of the individual veneered door panels along with a very small extra gap both behind and ahead of the door.There is also the small chamfered edge of the top and bottom surrounding the cabinet front, sides and back.


