 This week I am attending a week-long class with a renown furniture maker and prolific writer of woodworking articles and books. Garrett Hack is quite well known throughout North America for the detail and hand tool skills he brings to woodworking and furniture making. In the course I'm refreshing some existing skills and techniques along with learning a multitude of new skills. The essence of the course is fine detail such as inlay, stringing, banding, cockbeads, etc.One soon realizes how much patience and attention to detail this type of fine work demands. It is fairly easy to make a mistake and in the process waste a component of a furniture piece. The individual details are called elements and are added to a piece to both accentuate the piece and to add elegance. I am learning that good judgement is necessary to enhance a piece of furniture with these detail elements. It's sometimes best to add fewer rather than more elements to avoid simply having too busy graphics on the furniture.Delicate hand tool skills are the main ingredient of this type of work. Good, sharp tools are also very important. I find myself picking up a optical loupe to examine the recesses and grooves I have prepared for inlay and stringing, this demonstrates how small and precise the work is. A few periods of furniture style in past centuries featured adornment of furniture with these fine detail elements, notably the Federal period of furniture. As I once mentioned, furniture often denoted the status of an individual in these periods and therefore more detail and ornamentation made the piece more alluring and exclusive.I have prepared this sample of abalone inlay, a fan detail, dots and squares, a diamond ebony inlay and curved stringing which can be seen in the photo above. These are very nice touches to furniture in both my opinion and from the feedback I am receiving. It was a very constructive week with many new techniques and processes acquired.
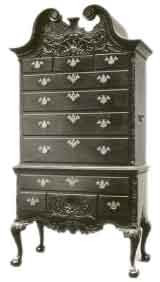 I find it fascinating how furniture design has evolved over the centuries. If we go back to the middle ages and the era before, quite a few developments in furniture construction techniques were in progress. Prior to this era, in the centuries before, very little furniture was available, it was considered a luxury to have chairs, tables and cabinets. The larger, more finely made furniture of this era was typically destined for the aristocracy of the time as a display of their wealth and status. Most conventional furniture of these early periods was assembled without consideration to wood expansion and contraction or wood movement. This worked for many years, since the interior of buildings in this era was often at the same temperature as the exterior. With the advent of heated interiors, wood movement became much more of a factor to deal with in construction and design of furniture, and the practice of simply assembling wood planks together to form furniture needed to evolve. It was in the middle ages that frame and panel construction was adopted. This technique allowed a solid wood panel to literally float within a wood frame composed of rails and stiles. The solid wood panel could expand and contract on a seasonal basis, and not cause any structural failure within the furniture. All of a sudden many more possibilities were created for furniture design and its widespread appeal began in earnest. Furniture also began to become more affordable as of the 18th and 19th century, more furniture makers existed and sound construction techniques began to become standardized. There are numerous periods over the past centuries and each of these had a style or styles associated with them. Additionally, each country had a style of its own within these periods. One can see how similar furniture design principles were adopted by successive countries over the different periods. Popular furniture styles which are widely recognized have familiar names such as English Chippendale, German Biedermeier, American Federal and Arts & Crafts, French Art Nouveau, Italian Rococo, etc. To be continued...
 I left off in my last post with a gathering of jointer components which needed to be re-assembled. Over the past day or two I have been re-assembling the new ( to me) jointer. I did most of this work myself and after having done some careful analysis, I realized there was only one way to successfully perform the assembly. I slowly built up the jointer while it was inverted.. The critical phase of assembly is joining the two halves of the table, the infeed, outfeed, and cutterhead assemblies. Since the pieces are solid cast iron and extremely heavy, this was done while the pieces were inverted and raised off the floor with some boards and in perfect alignment with each other. I attached the outfeed and infeed portions of the table after lubricating the moving parts, rods and ways. At this point, the jointer table or main assembly is very heavy, so it stayed put while I built up the base. Once the main components, the table and base , were assembled together, the next step was to right the jointer from inverted. At this point the jointer is in stripped down form, without the motor, magnetic switch, rabbet ledge, fence assembly , etc. I had help to right it and afterwards installed the electrical cables, motor assembly, fence assembly, rabbeting ledge, knobs, cutterhead guard, etc. After moving it into its final spot, I set up the chip collection piping and ducting for the new jointer. A few adjustments later, and success! It joints wide boards very well, feels solid, and isn't very noisy.
 I have been needing a particular piece of machinery in my studio for quite some time now. I currently have a smaller version, but a larger one with greater capacity was very much needed. This machine is a jointer, which serves to surface or true one face side and edge of a rough board.The surfacing process removes any inherent twist, cupping, or bowing in the board. In my case, the larger capacity corresponds to the width of the jointer cutterhead, allowing me to surface one of the faces of much wider boards. The advantage to a larger width is that boards do not need to be reduced in width due to the constraints of a narrower, smaller jointer. The larger width allows me to maintain the figure of a board in its natural state and allows me to maintain a wider width of board for bookmatching purposes. As luck would have it, the availability of such a jointer was mentioned to me by a friend and I promptly looked into its purchase. This particular machine is a vintage Wadkin - Bursgreen (UK) jointer dating from sometime in the mid-1950's. The advantage to these older machines is their heft ,a large component of cast iron resulting in stability and solid, superior construction. Testimony of the superior quality of this vintage machine is the fact that it is still in use more than fifty years later. My current jointer has a 6 inch capacity, this vintage jointer has 9.25 inches capacity. This jointer weighs more than a quarter-ton. A few weeks went by and the call came that the jointer was available.I packed my set of tools and went to where it is located and performed the transaction. I knew beforehand from having already seen the jointer that it would need to be disassembled in as many parts as possible for ease of transport and coping with two sets of stairs at either location. I began disassembly with the help of Andy Woods of Woods & Co. I even brought a camera along to photograph the main units prior to disassembly for later use. Actually, I didn't mind disassembling it, it would provide me the opportunity to understand how this jointer is put together, specifically the moving mechanisms. A couple of hours later and we had it disassembled into manageable pieces for transport back to my studio. Two trips later, the jointer pieces were in my studio after which I took some time to clean them thoroughly and remove any old grease and dirt. The photo above are the jointer components gathered together after cleaning, and prior to assembly. Next, the assembly and adjustments.
 I would like to talk about the design of the jewelry armoire, something I neglected to do in my previous posts. The actual dimensions of the armoire were arrived at after close consultation with my client and discussing their needs. The client wanted a particular look and after producing a few sketches and drawings we arrived at a sort of design compromise. We discussed the woods to be used, the design, proportions, and detail work. I also considered a few structural factors, since the armoire design is sixty-five inches high and not on a very deep or wide footprint. This introduces a possible stability issue, which was worked around by maintaining a minimum depth and width for maximum stability in light of the small width and depth. The client also gave me artistic freedom to embellish the design as I felt comfortable with and to add any elements which would add to the uniqueness of the piece. The style of the armoire is contemporary therefore no pre-existing furniture period is really involved. I have, in the process, created a scale representation to show my client what the proportions look like in real life.
The joinery will involve primarily mortise and tenons for the door members and multiple dowel construction for the main carcase. At the rear of the armoire there will be a frame and panel back which is completely rabbeted into the frame of the armoire. Interior joinery will primarily consist of dovetailed drawers. I haven't discussed the base of the armoire at this point, since it is not yet definite how I will assemble this. The armoire and base will be two separate sections for ease of transport and it generally makes much more sense to build this way. One feature of the armoire I am looking forward to working on are the tapered legs with contrasting toe caps. This is sort of uncharted territory for me and to top this off I hope to add some string inlay into the individual legs.
The armoire is designed to hide its contents completely for obvious reasons, so this was a no-brainer in the preliminary design criteria. I worked with the Golden rectangle or carcase ratios as much as possible, yet I needed to modify these proportions for both functional and aesthetic reasons. The functional reasons are basically the stability of the armoire given its height, width, and depth. The aesthetic (form) reasons are specifically to keep the depth of the armoire down to the minimum necessary. More about the design later as the project progresses...
 This past week has been a busy one for me, dividing my time between the studio and our outside property. We leave a considerable amount of outside work to early fall when the days are cooler and it is a little more bearable to work outside. These past few days has been tree maintenance, removing any shoots and dead limbs. Later this fall comes the pruning, it is best to wait until the trees have shed their leaves to do this and to prevent any damage to the trees. In the studio, progress on the jewelry armoire is advancing with some final wood preparation. This involves thicknessing and dimensioning the individual components to the correct size as per the drawings. The door frame components need to have an extra length included to allow for the tenons. The tenons of the rails fit into the mortises of the stiles. Rails run horizontally, whereas stiles run vertically. Once the components of the jewelry armoire door frames have been dimensioned correctly, I place them together to make certain I have not made an error in my calculations. this is a form of sanity check. The door frame members typically define the width of the cabinet or armoire in my case, but this is wholly dependant on the hinging arrangement of the doors to the cabinet sides. If the doors overlap the sides completely, combined door widths define the cabinet width, if the doors are rabbeted into the cabinet (armoire) sides, there is a extra dimension on either side which is added to the door widths to determine cabinet width. These are all decisions made in the design process, however, they do need to be taken into consideration. I have also been preparing a couple of smaller pieces for an upcoming exhibition at a gallery.
In the next few days I begin the next phase of the project. This involves gluing up the individual components of the cabinet sides, top and bottom. Hopefully I won't run into any snags. After this is complete I begin to create the tiger maple panels for the doors. My aim is to have the doors assembled and glued before assembling the cabinet as a unit.
 These past few days have been spent creating a cut list for the jewelry armoire and preparing some of it. A cut list is the list of wood components necessary to assemble the piece of furniture. There are typically two approaches to this phase of furniture construction.. All the components can be milled and prepared from the cut list beforehand or certain groupings of components can be prepared as the project progresses. The advantage of preparing all the components beforehand is that the lumber utilized is optimized and very little waste results. Also, certain grain orientations can be selected from the stock of lumber for the furniture piece. Personally, I like to create a cut list but tend to cut and mill my components as the project progresses. For example, I will assemble all the upper cabinet carcase components , then the door components, door panels, and so on. I typically rough cut and let the wood sit and acclimatize prior to milling, this ensures maximum stability of the wood. A large percentage of the preparation of the components of the armoire is done with hand planes. In this case, after resawing the large panels I needed to remove some accumulated bowing in the resawn boards using hand planes. The bowing is directly associated with internal tension in the boards, the boards need to acclimatize after resawing to minimize the lingering tension in the board halves.
I also spent a few hours this week tuning and sharpening some hand tools, namely hand planes. I have a fairly large selection of wooden hand planes and these typically need to be tuned through the different seasons, the bodies being of wood. I've learnt over the years to keep my tools as sharp as possible, the performance is better and less effort is needed to achieve the results needed.
We're continually dealing with the abundant apple crop we have this year. A few hours this week were spent raking apples and collecting them into small piles. This appears to be the only way to deal with the large amount of apples which have fallen. We are having guests over this weekend to help with the apples. It is interesting how the weight of the apples on some branches have actually lowered the branch to close to ground level and the branches don't break, nature's resiliency in action. In one case however, we needed to tie the branch back to the main trunk for fear it would snap off.
 We've been blessed with an abundance of apple trees on our property here outside Ottawa, Ontario. So much so that we needed to cull the apple trees down to a manageable 40-50 trees or so, down from hundreds. In the process, I have acquired some nice apple wood which is currently stacked. I will use this apple wood mostly for small tool handles and any smaller pieces of it for enhancing the charcoal grilling we often do here. Apple wood in itself is a beautifully figured wood, great for tool handles and for small panels and drawer fronts, as are most fruit tree woods. Today we had some family over to help pick these apples, the ones on the trees, as many have simply fallen, nature's way of dealing with too many apples on a tree. Did I mention that deer love apples. Well you can't walk around the property without getting a whiff of apples, the result is many deer grazing in and around here throughout the fall. I'm currently enjoying a great novel written by a Cuban Air Force pilot who defected to the US in 1991. It is a true story and includes interesting episodes on different aspects of life in Cuba throughout the past four decades. The novel "Wings of the Morning" was mentioned to me by a Cuban friend who himself was a fighter pilot in the Cuban Air Force and the story is based on his commanding officer. This is one of those books you can't put down once you begin.So lately I've been dividing my time between any outside work I need to do at this time of year and current work in progress in the studio. In three weeks or so, I'll be free and clear of outside chores and will be able to dedicate my time fully to my studio handcrafting custom pieces. I have some exciting ideas and designs I would like to incorporate into furniture. These are ideas I have accumulated over the summer from having visited historic sites, villages and the odd museum exhibition.
 The end of summer is a few weeks away and the weather is already changing. The nights are cooler, the days shorter but warm. I usually become busier in the shop at this time leading into the fall. We've experienced an exceptional summer, no complaints in this area. My focus from now until completion is a large cherry jewelry armoire. This is a custom order with the design, sketching and drawing phases complete. I have acquired the cherry lumber and tiger maple veneer for the door panels. The design is primarily case construction with a cabinet on legs. The tapered legs form a base which is pegged and detachable from the upper cabinet.
This is a proven design and will allows for the easy knock down and setup of the armoire. The black cherry to be used for the cabinet carcase is clear, select cherry with quarter-sawn door components, rails and stiles. The reason I am using quarter-sawn door frame components is to make sure the components are straight-grained and do not detract from the graphics of the door panels.The door panels are tiger maple and kind of on the wild side so in the grand scheme of things the cabinet frame needs to be subdued to have the tiger maple effect pronounced. I've had great experience with tiger maple door panels in the past and the shimmery, wavy effect produced when finished with multiple coats of thinned blonde shellac.
I've designed multiple dovetailed drawers into this particular piece. This will be by far the most time consuming part of the build process. The base has two side by side drawers and the upper cabinet has multiple stacked drawers along the lower part. The upper part is free and clear to allow for any hanging chains, this will be accomplished with two revolving solid brass carrousels. The client is excited about this piece, so am I, as it utilizes most if not all my acquired skills and techniques.
 Summer is not quite over yet but I would like to share with you some of what I accomplished. Summer is not very long in my part of the world and need to be enjoyed to its fullest for before you know it, it begins to wind down. I finally had time to sit out in our gazebo surrounded by trees and read some good books which have been accumulating. Notably, a book on English furniture creation "Making Great Furniture". This book offers a different perspective on furniture making, breaking away from the traditional North American processes and techniques. Some different, intricate joinery is presented along with very well detailed construction techniques along with detailed coloured diagrams.Not everything I read is woodworking related so I had the opportunity to read two great novels along with a well-written book on furniture history, a growing passion of mine. Furniture history through the different periods in the past centuries dovetails in with my work. I was called upon in the past year to design a period piece of furniture with a mix of contemporary features. This led me to research in this case Hepplewhite period furniture and in the process my eyes were opened to many different styles from these different historical periods. Many elements from these different historical periods have been adapted into modern furniture, it's nice to read about their origins and evolution. Looking back through time, it also becomes obvious that in many cases a great emphasis on more detail and intricacy was placed on furniture since in many cases furniture defined the person , their place in society and their wealth.Something else I had the opportunity of doing this summer was to visit a few flea markets and antique shops in the quest for old tools. I was introduced to the virtues of old handplanes and other old woodworking tools a few years back and have since been on the prowl for any old, derelict tools with no family. My best find, I only had 3 in all this summer, is a 24 inch European wooden jointer plane of which I posted a pic here. It was in reasonably good condition with only some wear on the sole. After installing an insert ahead of the mouth, I flattened and trued the hornbeam sole. Surprisingly, it works fine and I've gone ahead and used it a few times already. The other finds are a European wooden smoother with horn , and an antique English ebony and brass mortising gauge.
Well here I am, new to blogging. I thought I would create this blog to document my design and build processes and to be able to share with others some of my ideas on both the design and creation of furniture. I'll try to keep the blog up to date with studio work which I am in the process of completing and any issues I have run against. Once again, welcome to The Refined Edge and please come back often for updates and conversation about furniture design and making.

 This week I am attending a week-long class with a renown furniture maker and prolific writer of woodworking articles and books. Garrett Hack is quite well known throughout North America for the detail and hand tool skills he brings to woodworking and furniture making. In the course I'm refreshing some existing skills and techniques along with learning a multitude of new skills. The essence of the course is fine detail such as inlay, stringing, banding, cockbeads, etc.


