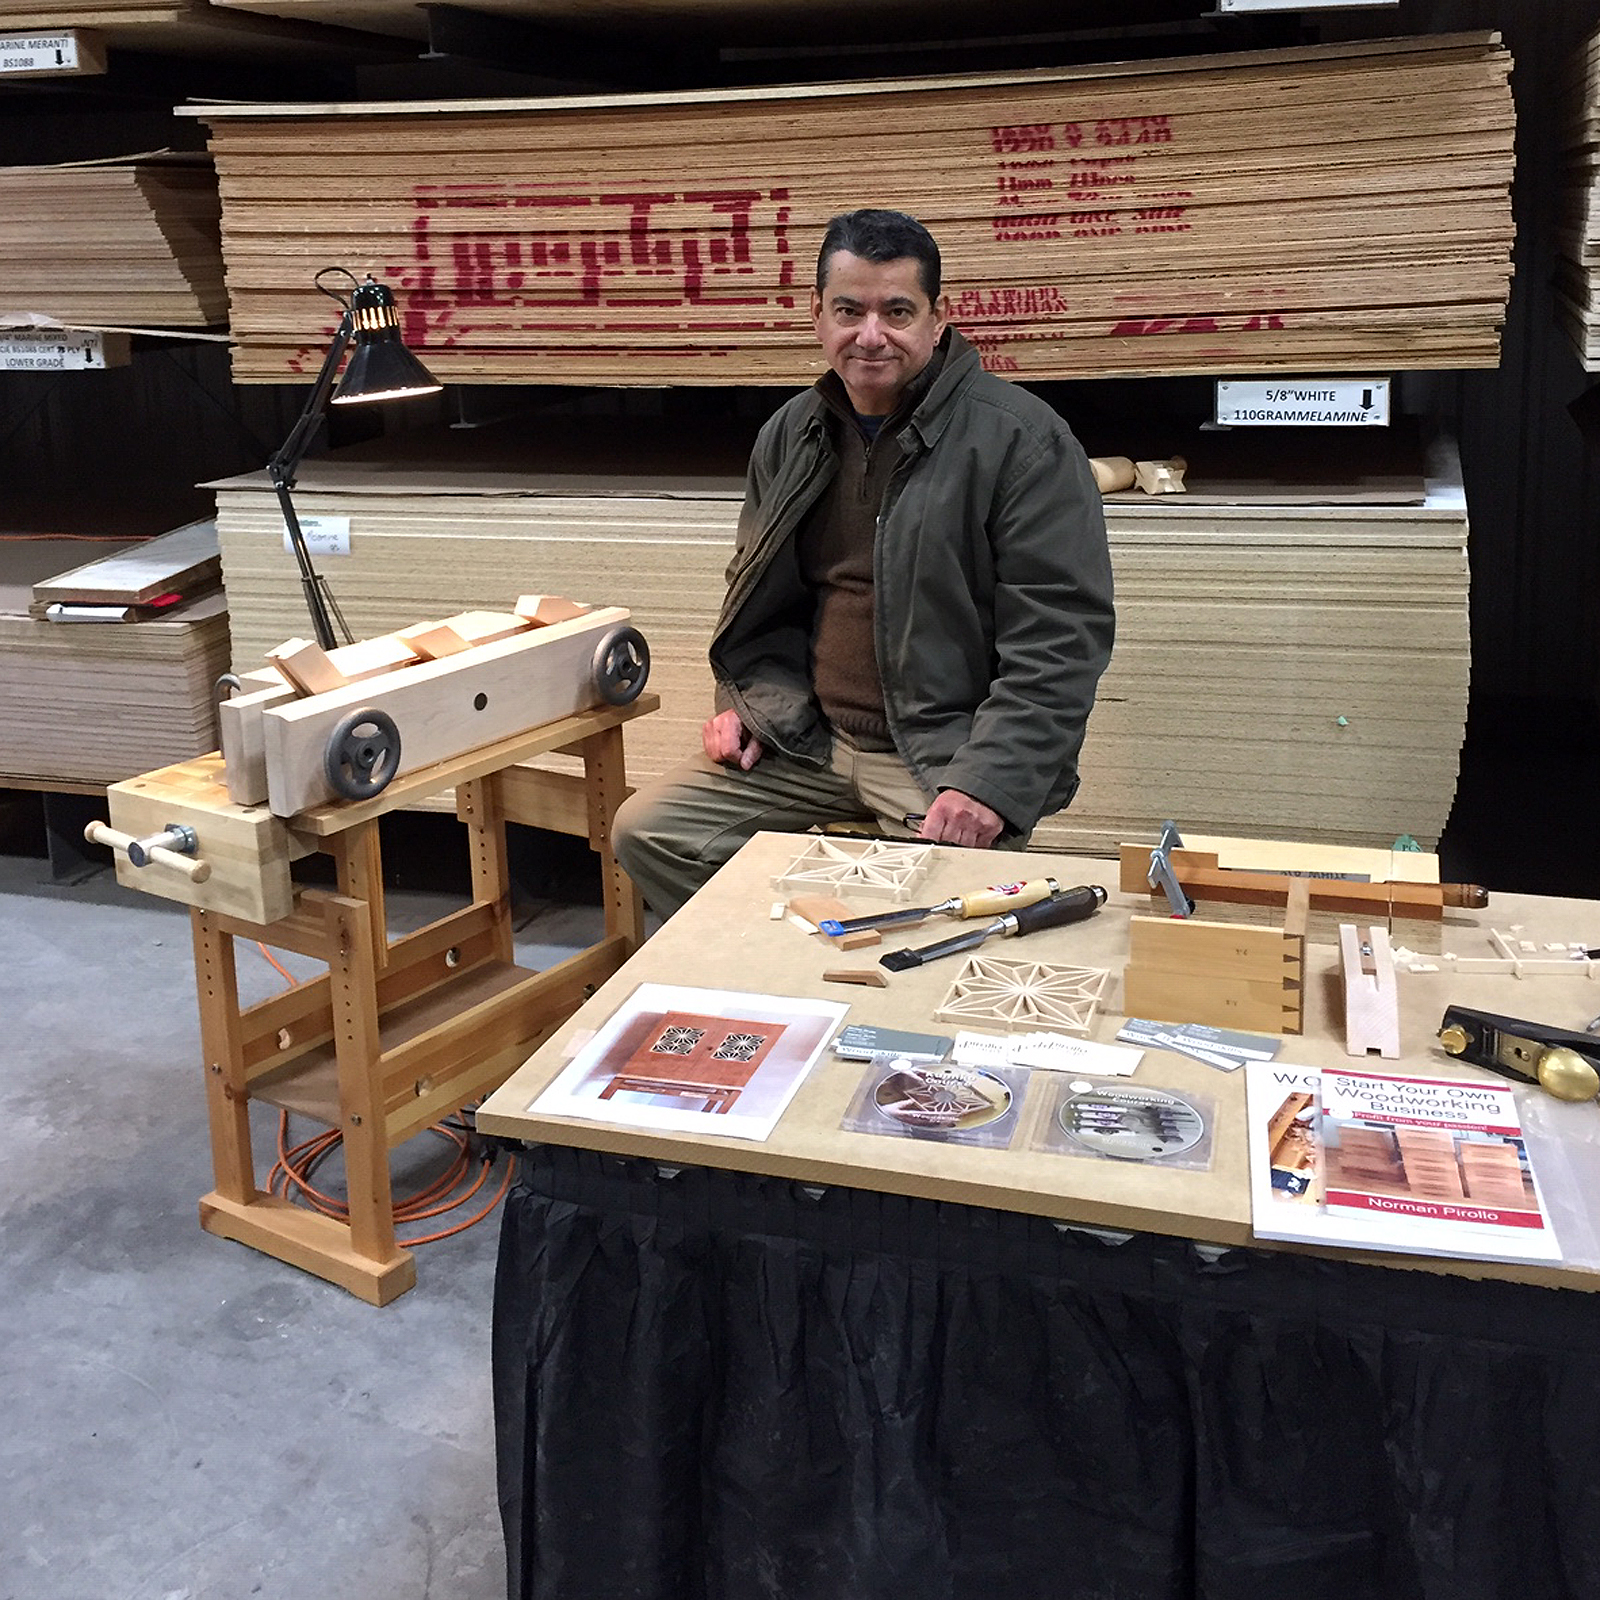
I came across an opportunity to both demonstrate and talk about the traditional Japanese craft of Kumiko at an annual woodworking event. In discussion with a local wood supplier and mill (Wood Source Ottawa, Ont.), they mentioned their upcoming annual open house and how they encouraged local vendors and artisans to participate. I quickly signed up at the opportunity to present and share my passion of Kumiko. Proceeds from the open house silent auction also went to a good cause, so this became another motivation for me to participate. I truly enjoy discussing woodworking and love to engage with people and hopefully motivate them to either start or continue to pursue woodworking.
I had several days to prepare and had sufficient time to create enough Kumiko components to last through the open house. The opportunity also challenged me to devise an innovative way to hold Kumiko guide blocks without having to continually unclamp and clamp the critical guide blocks to a vise. I was able to enlist my Moxon vise along with a small workbench to perform this. The opportunity also provided me the impetus to market a Kumiko Course I had been working on. I could offer the video-based course at the open house! So this all came together and I enjoyed two days at the open house engaging with people and introducing them to the centuries-old traditional Japanese craft of Kumiko.
At first glance, people would be in awe at the small scale of components in Kumiko. Their first reaction was how intimidating and difficult it was to tackle. After engaging and demonstrating the ease of forming and shaping the small interlocking parts, their fears vanished. Often, people need to have a technique presented in a live setting to grasp its intricacies. I get this and can easily relate to this form of learning and visualization. Techniques of safely using a wide chisel to pare wood were also demonstrated, being the core of Kumiko component creation.
I enjoyed the experience and in the process made a few local contacts. Hopefully, I have encouraged a few people to tackle Kumiko and woodworking in general. Working in a solitary studio environment often keeps me from interacting with like-minded people that share a common interest in woodworking. People enjoy sharing their passion and the timing of this open house was ideal since I was between projects and needed a break from my furniture design + making.
Link to Kumiko Course
Showing posts with label workbench jigs. Show all posts
Tuesday, November 12, 2019
Wednesday, January 10, 2018
Moxon vise build...(Pt. 2)
The Moxon vise build continued and the vise was completed a couple of days after beginning the project. There was a considerable delay in determining the optimum length of the vise. This actually held me back since making it too short is essentially non-correctable later. Too long and there is a weight penalty as these Moxon vises tend to be heavy, especially with the Benchcrafted solid iron handwheels. Although the extra mass and weight can be your friend when clamping boards down, portability of the unit is also a consideration. I would need to determine the size of panels I most often worked with. In my work, I never go over about 20 inches in width so I set this as optimal distance between the screws. Then, using guidelines on screw hole placement provided in the Benchcrafted instructions, a final length of 28 inches was decided on. I did follow the suggested screw hole placement in the Benchcrafted instructions, this saved some time. Next was to mark the 3/4 inch screw holes and begin drilling, careful to have the holes in the front and rear jaws perfectly aligned.
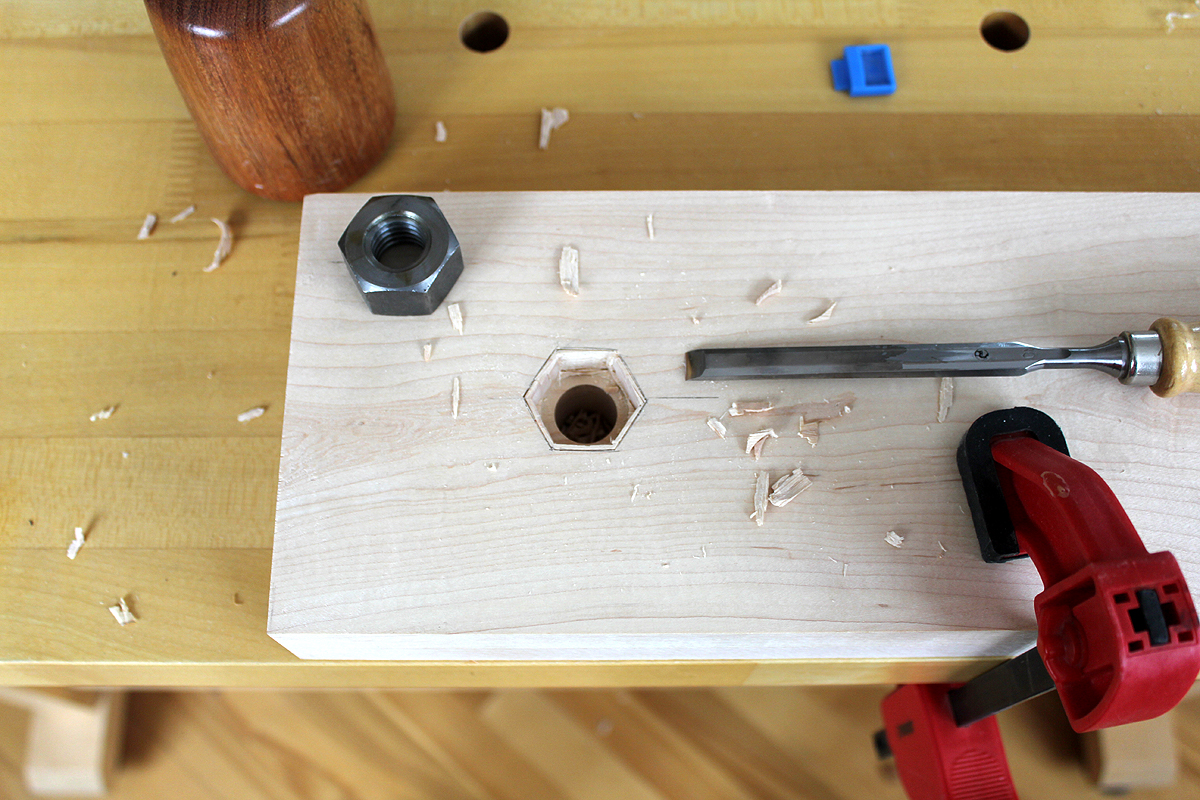
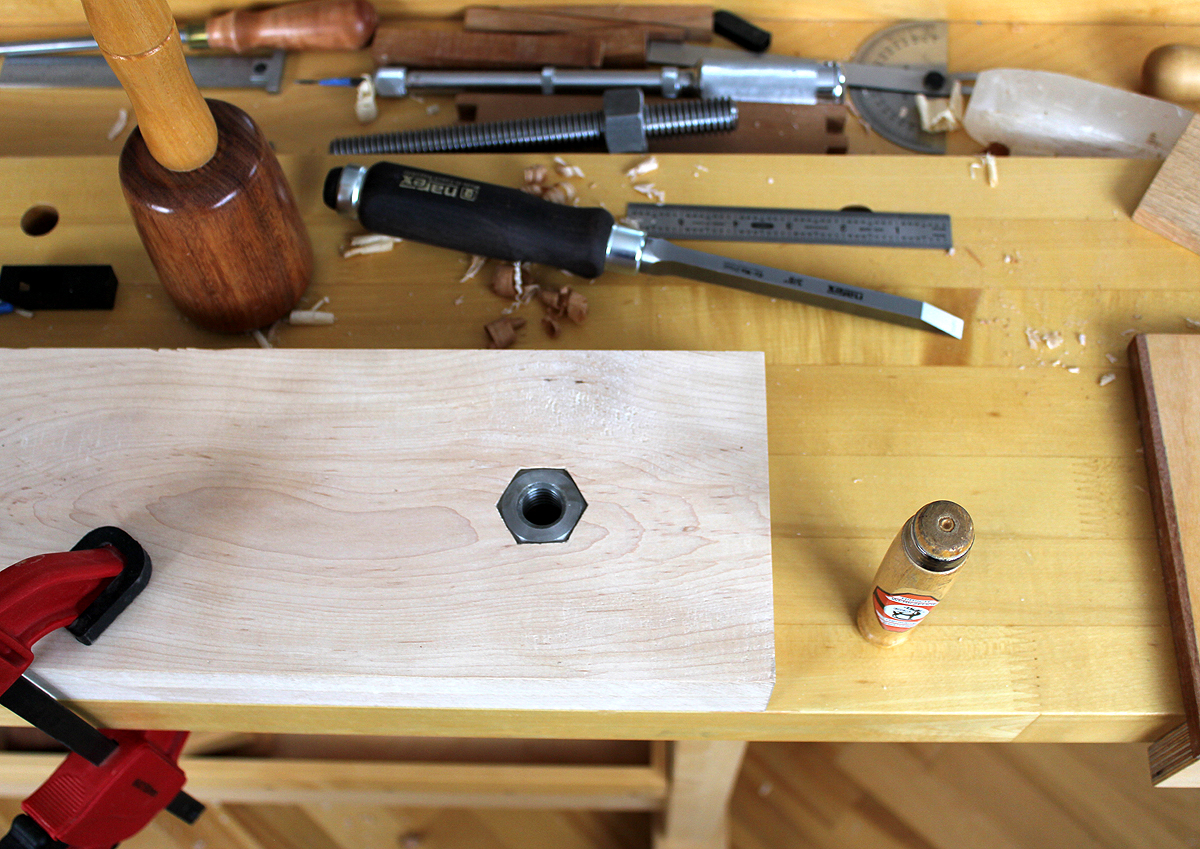
Mortising for the captive nut in the rear jaw inside face was performed using bevel-edge and mortise chisels. Hard maple is well.. hard! In this case, the mortise chisels excelled at hogging out material from the 3/4 inch deep mortise. With a softer hardwood, lighter bevel-edge chisels would have been sufficient. I also oriented the nut so it would align well with the long edges of the rear jaw, mostly an aesthetic consideration.
After test-fitting the Benchcrafted hardware and ensuring it worked smoothly, the next step was to attach a large block of wood to the rear. This block of wood would both stabilize the vise assembly and allow holdfasts to be used to clamp the Moxon vise to the workbench top. Several other intermediate steps were performed, always careful to get alignments exactly correct. There is almost no room for error in making these vises since replacing either of the jaws is both time and material consuming. A more comprehensive article on how I made this Moxon vise will be available at the web site soon.
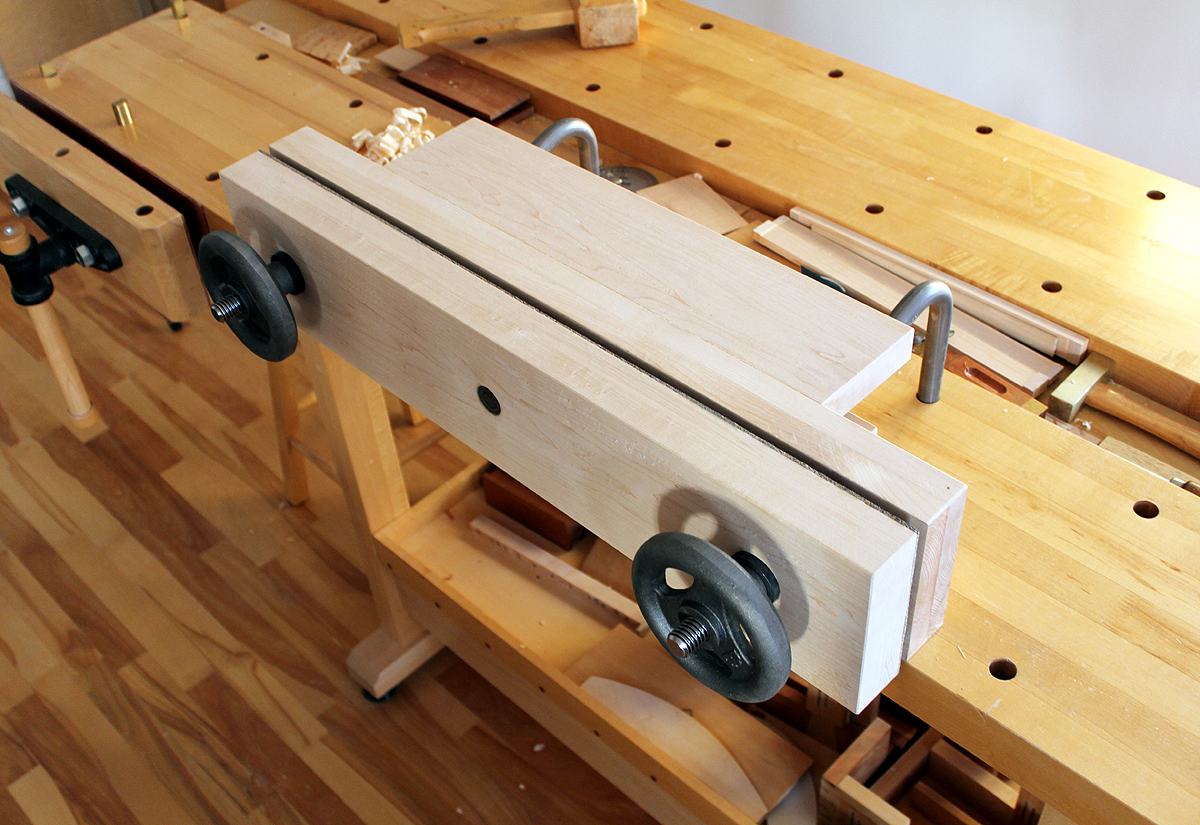
A table extension and vertical support was then added after ensuring the stabilizer was effective at clamping down the Moxon vise to the workbench. The table allows me to extend horizontal boards for marking..i.e. dovetails. I customized the design to use an extra row of dog holes in the center area of my workbench. I have two of these workbenches set as my primary workbenches, so the Moxon vise will be completely portable between benches. The vise can also be located almost anywhere on the workbench surface as the holdfast locations are optimized to clamp the stabilizer block of wood at rear of the vise. I am using Gramercy holdfasts but any holdfasts can be set up for use with the vise.
More detail of the handwheel, screw, and captive nut can be seen above. The table is reinforced below both long edges for maximum support, this to allow for any mallet work. i.e. chopping out dovetails. A large design consideration was to not make the Moxon vise too heavy as I would often be removing it from the workbench top and/or moving it between workbenches. The table size was optimized for this vise and the type of work I do. When designing your own Moxon vise, you will need to determine the size of boards and panels you most often work with. The overall length of the Moxon vise is the most important consideration in its design, it is best to get it right the first time!
A more in-depth article on how I made this Moxon vise will be available at the WoodSkills web site soon.
Mortising for the captive nut in the rear jaw inside face was performed using bevel-edge and mortise chisels. Hard maple is well.. hard! In this case, the mortise chisels excelled at hogging out material from the 3/4 inch deep mortise. With a softer hardwood, lighter bevel-edge chisels would have been sufficient. I also oriented the nut so it would align well with the long edges of the rear jaw, mostly an aesthetic consideration.
After test-fitting the Benchcrafted hardware and ensuring it worked smoothly, the next step was to attach a large block of wood to the rear. This block of wood would both stabilize the vise assembly and allow holdfasts to be used to clamp the Moxon vise to the workbench top. Several other intermediate steps were performed, always careful to get alignments exactly correct. There is almost no room for error in making these vises since replacing either of the jaws is both time and material consuming. A more comprehensive article on how I made this Moxon vise will be available at the web site soon.
A table extension and vertical support was then added after ensuring the stabilizer was effective at clamping down the Moxon vise to the workbench. The table allows me to extend horizontal boards for marking..i.e. dovetails. I customized the design to use an extra row of dog holes in the center area of my workbench. I have two of these workbenches set as my primary workbenches, so the Moxon vise will be completely portable between benches. The vise can also be located almost anywhere on the workbench surface as the holdfast locations are optimized to clamp the stabilizer block of wood at rear of the vise. I am using Gramercy holdfasts but any holdfasts can be set up for use with the vise.More detail of the handwheel, screw, and captive nut can be seen above. The table is reinforced below both long edges for maximum support, this to allow for any mallet work. i.e. chopping out dovetails. A large design consideration was to not make the Moxon vise too heavy as I would often be removing it from the workbench top and/or moving it between workbenches. The table size was optimized for this vise and the type of work I do. When designing your own Moxon vise, you will need to determine the size of boards and panels you most often work with. The overall length of the Moxon vise is the most important consideration in its design, it is best to get it right the first time!
A more in-depth article on how I made this Moxon vise will be available at the WoodSkills web site soon.
Tuesday, July 25, 2017
Bench stops (12th anniversary)...
In 2005, I developed this system of bench stops as a simple alternative to installing a tail vise on a workbench. So I've been using this system of bench stops for 12 years now, it will be the 12th anniversary shortly! The system is set up on one of my original workbenches which happened to be my main workbench at the time. This particular shop-made workbench did not lend itself well to incorporating a tail vise so I told myself there had to be a better way to hold boards firmly while hand planing. Apologies for the vintage photography, but I wanted to keep the article period correct :)
This alternative tail-vise setup is used when face planing boards. Most flat, regular benches can easily be modified to incorporate this hand planing setup using bench stops ( Roubo style). Photos below are of the bench stop setup on the workbench in my workshop. This bench has been modified for adapting the two bench stops. Adapting a bench can be expanded for longer bench stops, more holes for versatility, etc. I chose this particular hole spacing for the type of work I do. I am also left-handed and plane left to right, therefore I set this up on the back side of my bench which is unencumbered by a face vise ( the face vise at front of bench ).
It is critical to get the 3/4 in. dowel holes square to the bench and in-line with each other, to ensure that the 12 in. bench stops are perpendicular to each other. The side bench stop does a great job of preventing the board from rotating sideways while hand planing with diagonal strokes. It has a large bearing surface to keep any size board from rotating. The side bench stop is also movable within a 12 in. span on 3 sets of holes, allowing for narrow boards and wider boards (2 in. to 14 in.).
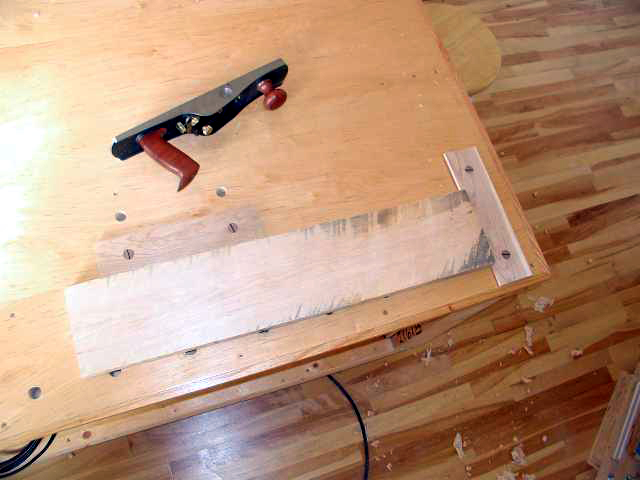
The side bench stop can be swung around towards the front bench stop with a parallel set of holes, this is to accommodate shorter boards. Pictures above and below provide a better explanation.
The wide front bench stop also serves to prevent the board from rotating or shifting sideways as it has a large bearing surface for the front edge of the board. Bench stops (front and side) are friction fit so they can be raised (1/4 in. to 3/4 in.) to accommodate thicker boards, very much like a bench dog. Otherwise, the minimum height of the bench stops would be approximately 1/4 inch. The hole spacing is arbitrary and based on the type of board sizes I typically hand plane in my own furniture making. two inch long birch dowels are glued in the bench stops using ebony wedges. The wedges are inserted into kerfs created in the ends of the dowels for tightness. Kerfs at the ends of the dowels are cut on a bandsaw.
A benefit of having a board simply against bench stops is that you really cannot drag the plane back in your strokes since it would pull the board back. This trains you to lift the handplane instead of dragging it back. The only wear on the blade then is from the forward stroke. Also you eliminate the tendency of bowing a thinner board caused by clamping between bench dogs and tail-vise and distorting the board while planing. You also gain more tactile feedback and control of your planing and it becomes easy and quick to re-orientate the board end for end or flip it over, etc.

Typical bench stop setup to act as a tail vise.
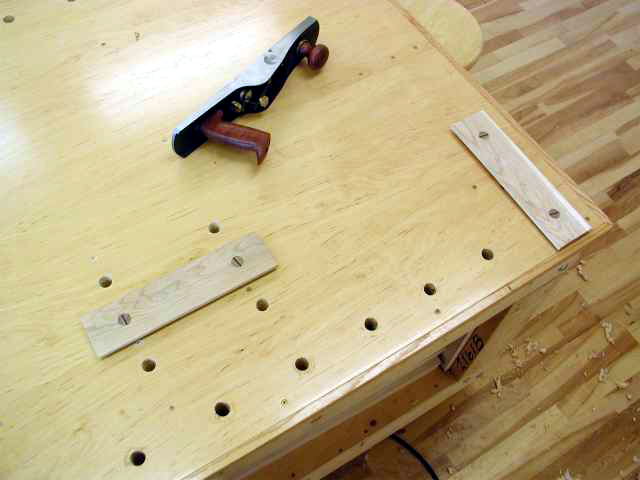
More holes can be added to allow for very short boards as done in bottom pictures. It is then a matter of swinging the side bench stop around towards the front bench stop. The spacing and location I have selected is optimized for the length and width of boards I typically handplane in my furniture making.
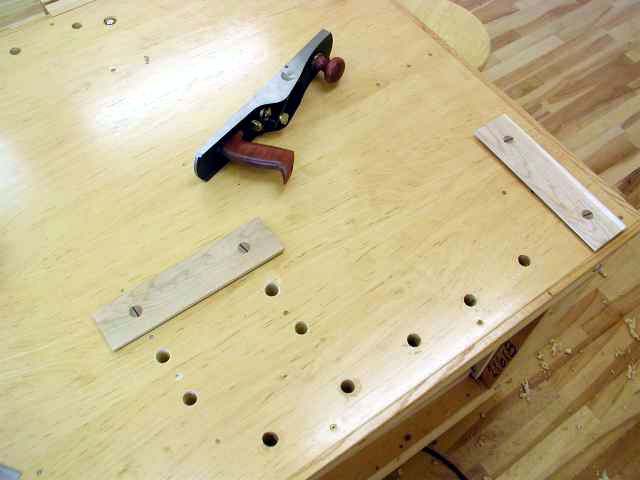
The bored 3/4 in. holes can also be used for bench dogs and holdfasts for irregular sized pieces.
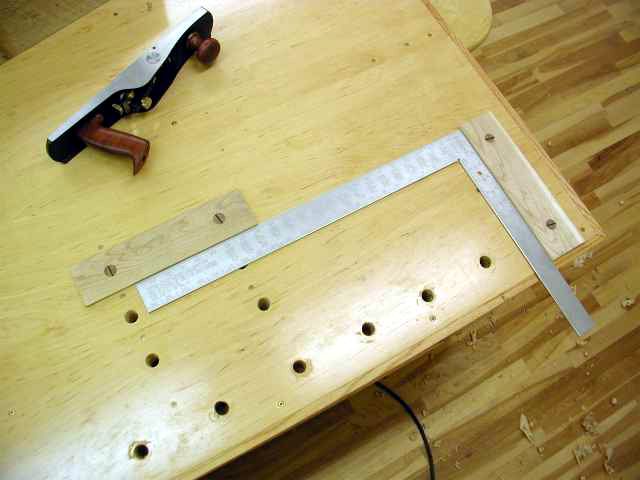
Align side bench stop to be perpendicular with face of front bench stop using a large square to mark holes. This will ensure the complete edge of the bench stop is against the board to be planed.
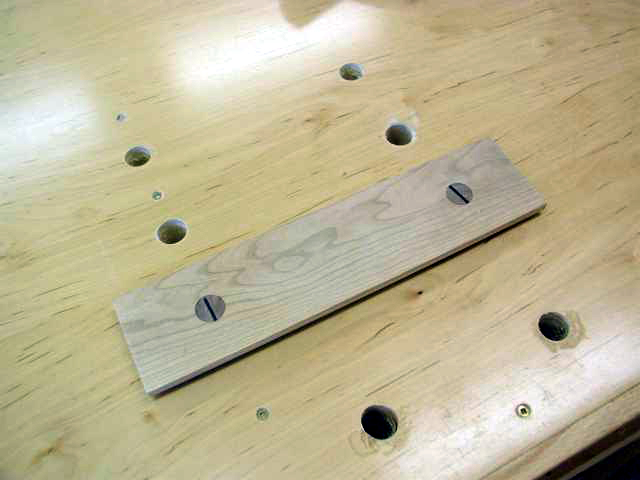
Side bench stop set to narrowest width, closest to edge of bench.
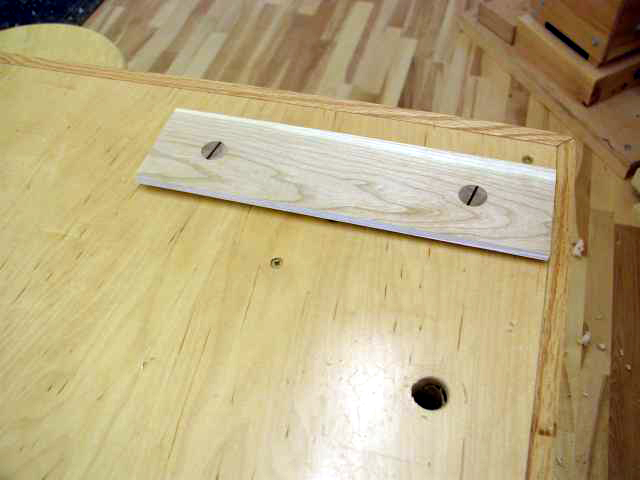
Bench stops can be raised or lowered as conventional bench stops for thinner or thicker boards.
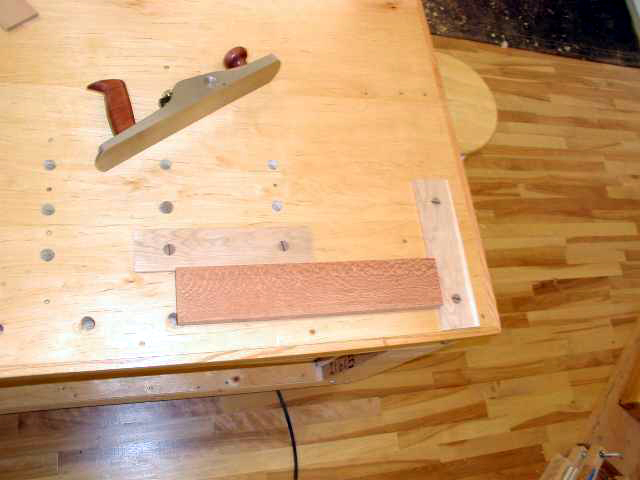
A short, narrow piece of lacewood being planed.
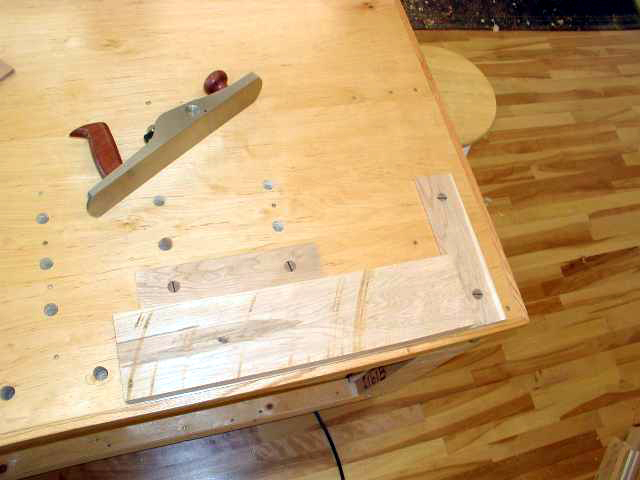
Parallel set of holes bored to accommodate shorter and wider boards shown above. It is recommended to lay out all the holes you will need for this system and then drill them. This method ensures that all holes are square and perpendicular to each other and the front bench stop.
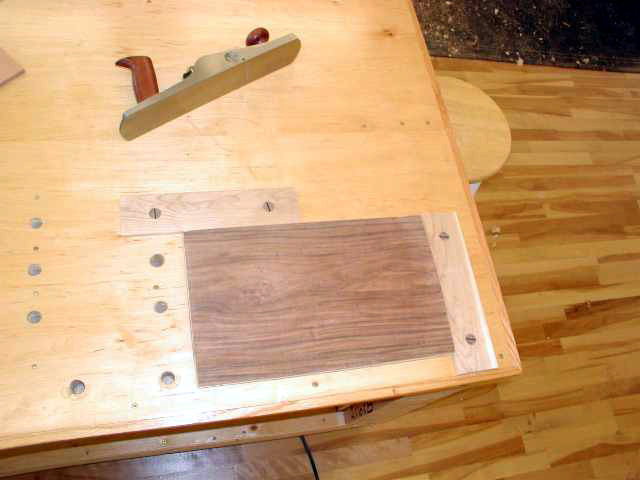
A small, wide panel being face-planed.
Developing this alternative tail vise idea led to an article on bench stops and jigs I wrote for Fine Woodworking Magazine. The 4 Bench Jigs for Handplanes article was published in early 2009.
This alternative tail-vise setup is used when face planing boards. Most flat, regular benches can easily be modified to incorporate this hand planing setup using bench stops ( Roubo style). Photos below are of the bench stop setup on the workbench in my workshop. This bench has been modified for adapting the two bench stops. Adapting a bench can be expanded for longer bench stops, more holes for versatility, etc. I chose this particular hole spacing for the type of work I do. I am also left-handed and plane left to right, therefore I set this up on the back side of my bench which is unencumbered by a face vise ( the face vise at front of bench ).
It is critical to get the 3/4 in. dowel holes square to the bench and in-line with each other, to ensure that the 12 in. bench stops are perpendicular to each other. The side bench stop does a great job of preventing the board from rotating sideways while hand planing with diagonal strokes. It has a large bearing surface to keep any size board from rotating. The side bench stop is also movable within a 12 in. span on 3 sets of holes, allowing for narrow boards and wider boards (2 in. to 14 in.).

The side bench stop can be swung around towards the front bench stop with a parallel set of holes, this is to accommodate shorter boards. Pictures above and below provide a better explanation.
The wide front bench stop also serves to prevent the board from rotating or shifting sideways as it has a large bearing surface for the front edge of the board. Bench stops (front and side) are friction fit so they can be raised (1/4 in. to 3/4 in.) to accommodate thicker boards, very much like a bench dog. Otherwise, the minimum height of the bench stops would be approximately 1/4 inch. The hole spacing is arbitrary and based on the type of board sizes I typically hand plane in my own furniture making. two inch long birch dowels are glued in the bench stops using ebony wedges. The wedges are inserted into kerfs created in the ends of the dowels for tightness. Kerfs at the ends of the dowels are cut on a bandsaw.
A benefit of having a board simply against bench stops is that you really cannot drag the plane back in your strokes since it would pull the board back. This trains you to lift the handplane instead of dragging it back. The only wear on the blade then is from the forward stroke. Also you eliminate the tendency of bowing a thinner board caused by clamping between bench dogs and tail-vise and distorting the board while planing. You also gain more tactile feedback and control of your planing and it becomes easy and quick to re-orientate the board end for end or flip it over, etc.

Typical bench stop setup to act as a tail vise.

More holes can be added to allow for very short boards as done in bottom pictures. It is then a matter of swinging the side bench stop around towards the front bench stop. The spacing and location I have selected is optimized for the length and width of boards I typically handplane in my furniture making.

The bored 3/4 in. holes can also be used for bench dogs and holdfasts for irregular sized pieces.

Align side bench stop to be perpendicular with face of front bench stop using a large square to mark holes. This will ensure the complete edge of the bench stop is against the board to be planed.

Side bench stop set to narrowest width, closest to edge of bench.

Bench stops can be raised or lowered as conventional bench stops for thinner or thicker boards.

A short, narrow piece of lacewood being planed.

Parallel set of holes bored to accommodate shorter and wider boards shown above. It is recommended to lay out all the holes you will need for this system and then drill them. This method ensures that all holes are square and perpendicular to each other and the front bench stop.

A small, wide panel being face-planed.
Developing this alternative tail vise idea led to an article on bench stops and jigs I wrote for Fine Woodworking Magazine. The 4 Bench Jigs for Handplanes article was published in early 2009.
Friday, July 29, 2016
New product, handcrafted bench dogs...
I have been successfully using these hardwood bench dogs in my furniture design+build studio for over 8 years. Why not make them available as a product. For most woodworkers, time is both limited and valuable. I have the setup and expertise to make these. The result is more free time for woodworkers to do what they love.
Hardwood bench dogs are better suited to working with wood than metal ones. This solid hardwood bench dog has a 3/4 inch diameter round profile. The round bench dog is intended for use in workbenches with 3/4 inch round holes. A spring-loaded bullet catch is press fit into the sliding part of the bench dog. This ensures that the bench dog makes a solid fit with the workbench hole.
The length of the bench dog is 3.75 inches which is ideally suited to most workbench thicknesses. To ensure positive clamping of thinner stock, a raked flat notch is recessed on one side of the bench dog. Leather is applied to the face of the raked flat face of the notch to prevent wear on furniture components clamped against the bench dog. The bench dog can easily be lowered into the dog hole when not in use, and raised for use.

The bench dog can be raised to match the thickness of the stock that is being hand-planed, assuming there is a 3/4 inch through-hole in the workbench surface. The hardwood bench dog eliminates the risk of marring the metal sole or blade of a metal-bodied handplane. The hardwood used in the bench dog design is oak.
The price for each handcrafted bench dog is currently $11.50 and available through WoodSkills
Hardwood bench dogs are better suited to working with wood than metal ones. This solid hardwood bench dog has a 3/4 inch diameter round profile. The round bench dog is intended for use in workbenches with 3/4 inch round holes. A spring-loaded bullet catch is press fit into the sliding part of the bench dog. This ensures that the bench dog makes a solid fit with the workbench hole.
The length of the bench dog is 3.75 inches which is ideally suited to most workbench thicknesses. To ensure positive clamping of thinner stock, a raked flat notch is recessed on one side of the bench dog. Leather is applied to the face of the raked flat face of the notch to prevent wear on furniture components clamped against the bench dog. The bench dog can easily be lowered into the dog hole when not in use, and raised for use.

The bench dog can be raised to match the thickness of the stock that is being hand-planed, assuming there is a 3/4 inch through-hole in the workbench surface. The hardwood bench dog eliminates the risk of marring the metal sole or blade of a metal-bodied handplane. The hardwood used in the bench dog design is oak.
The price for each handcrafted bench dog is currently $11.50 and available through WoodSkills
Subscribe to:
Posts (Atom)